Showing posts with label Sharepoint. Show all posts

Sharepoint Example Large Lists Unique Columns

Sharepoint Tutorials about Large List and Unique Columns

This Sharepoint 2013 or 2010 example is about how we can work with  how you can work with large lists and what unique columns look like. SharePoint 2013 has support for very large lists of up to 50 million items. With this expanded list size comes the ability to throttle and control how much data is returned to the user and prevent large queries from compromising the SharePoint farm. 
  • For this demo we have created a console application named FillUpLargeListOpen a command window and navigate to it. 
  • Execute the console application by specifying the URL to your SharePoint site and the name of the list you want to populate with 6000 items.
  • we need to create a console application that creates a large list with 6000 items in it. 
  • The List Settings page will warn you that the threshold of 5000 items is exceeded.
  • When the list has a large number of items but hasn’t reached the threshold yet, the bar will warn you that the list is not throttled yet but that the list has passed the warning level.
  • Open an Internet browser and navigate to the LargeList in your SharePoint site.
  • Navigate to the List Settings page and notice the extra section under the list description telling that the list contains 6000 items while the threshold is 5000 items


The demo console application will query a large list with a number of items that exceeds the threshold. This will work when you are logged in as the administrator.
You can disable the throttling on a list by setting the EnableThrottling property to false. 
Open the ListThrottling project from the starter files in Visual Studio 2010.
This console application will query the LargeList list.
The largeList.Items method will throw an error when logged in as a regular user but will be executed when logged in as administrator.


static void Main(string[] args)
{
    SPListItemCollection items;

    // get reference to site passed in as an argument
    using (SPSite siteCollection = new SPSite(
   "http://intranet.contoso.com/sites/ListsAndSchemas"))
    {
       SPList largeList = 
          siteCollection.RootWeb.Lists["LargeList"];

       // if logged in as a regular user, the following 
       // would throw an exception 
       // if the list contained more than 5000 items...
       items = largeList.Items;
       Console.WriteLine(items.Count);

       // the following will disable the throttling on 
       // the list
       largeList.EnableThrottling = false;
       largeList.Update();
       items = largeList.Items;
       Console.WriteLine(items.Count);
   }
}
If you want to check whether a list is throttled before executing a query, you can test upon the IsThrottled property of the list.You can add the following code to check whether the list is throttled or not.


It is not a good idea to test on the number of items in the list because you don’t know what the throttling setting is in the web application.You can also decide to put the throttle off.Set the EnableThrottling property of a SPList object off to disable throttling:


This code can run under a normal user account.Open the Windows PowerShell V2 (CTP3) command shell.Execute the SharePoint snap-in to load the SharePoint assemblies:Add-psSnapin Microsoft.SharePoint.Powershell.Define a variable for the site collection using the PowerShell cmdlet get-SPSite:

$sitecol = get-SPSite http://intranet.contoso.com

The settings about throttling are not set at site collection level but at web application level. The WebApplication property will return the web application. To get all properties of the WebApplication, you can run the following command:
$sitecol.WebApplication | select *

The property MaxItemsPerThrottledOperation returns the upper limit:
$sitecol.WebApplication.MaxItemsPerThrottledOperation

You can also check the property MaxItemsPerThrottledOperationOverride how far you can override this limit. In this case super users are able to execute queries up to 20000 items:
You can also check if it is allowed to override the throttling settings:
To check the properties of a specific list, you can execute the following PowerShell command:
$sitecol.RootWeb.Lists[“LargeList”]
The property concerning throttling is the IsThrottled property, indicating whether the list is throttled or not.

Sharepoint Example Accessing List Data with LINQ

Sharepoint Tutorials Accessing SharePoint List Data with LINQ  

In this Sharepoint Examle we will learn how to use the SharePoint client object model to program an ECMAScript application against SharePoint data.This sharepoint tutorial will deal with accessing Sharepoint List Data with LINQ Entity Framework.
  • Here we are creating a demo project  which is a standard SharePoint project developed using the Visual Studio Tools for SharePoint. 
  • It contains two application pages.
  • The LAYOUTS folder of the SharePoint file system contains a javascript library sp.js which contains the client object model for ECMAScript.
  • Open the project HelloClientOM from the starter files in Visual Studio 2010.
  • Notice the ScriptLink tag in the PageHead content place holder. It references the sp.js library
  • Double-click the ClientOM1.aspx page to view the code.
<SharePoint:ScriptLink ID="SPScriptLink"  runat="server"  LoadAfterUI="true"
Localizable="false" Name="sp.js" />
  • Also in ECMScript you need to create a client context before you can retrieve data from a SharePoint site.
  • With ECMAScript you can retrieve the client context from the SharePoint site in which the script runs.
  • Use the Load method to specify which data to load from SharePoint.
  • Use the asynchronous method executeQueryAsync to retrieve the information from SharePoint.
  • This method needs a reference to a callback method when the execution succeeds and a reference to a callback method when the execution fails
  • The PageHead content place holder also contains a javascript function execClientOM.  You can use SP.ClientContext.get_Current() to retrieve the client context of the SharePoint site in which the application page runs.
  •  You can load a number of SharePoint objects before the execQueryAsync method is executed to retrieve the desired information from SharePoint. 
  • This javascript function defines that the current SharePoint site and the lists of this site needs to be retrieved
function execClientOM() 
{
    // get a client context
    var context = new SP.ClientContext.get_current();

    // load the current site (SPWeb)
    this.site = context.get_web();
    context.load(this.site);

    // load the site's lists
    this.lists = site.get_lists();
    context.load(lists);

    // execute an async query
    context.executeQueryAsync(
       Function.createDelegate(this, this.onSuccess), 
       Function.createDelegate(this, this.onFailure));
}


When the execQueryAsync method succeeds, the onSuccess method is executed and displays the title of the site and the number of lists in the SharePoint site:
function onSuccess(senger, args) {
   alert("Site title: " + this.site.get_title() + "\n" + 
     "Total lists in site: " + this.lists.get_count());
}

When the execQueryAsync method fails, the onFailure method is executed and displays the error message:
function onFailure(sender, args) {
   alert("Request failed " + args.get_message() + "\n" + 
      args.get_stackTrace());
}
The application page contains a content place holder with ID Main. This content place holder contains the controls that make up the user interface. The execClientOM javascript function is triggered when the user clicks a HTML button Locate the Main content place holder, which contains only one HTML control, a button.


  • When the application page runs in the context of SharePoint, clicking the button will execute the javascript that calls the client object model. 
  • Build the project and deploy it to the SharePoint site. Open an internet browser and navigate to your SharePoint site. 
  • Navigate to the /_layouts/HelloClientOM/ClientOM1.aspx page.


Click the Execute Client OM button.A message box will pop up, displaying the title of the site and the number of lists in the site.
You can achieve the same using JQuery. The second application page creates a little accordion containing a list box that will display the lists in the SharePoint site.The project contains a second application page with name ClientOM2.aspx.Take a look at the PageHead content place holder in this page. The first tag is the ScriptLink tag and contains a reference to the sp.js file that contains the client object library.


The following tags contain references to the JQuery API and to some custom style sheets.


The javascript code creates a little accordion containing all the lists in the SharePoint site. Locate the Main content place holder, which contains an HTML list box and a DIV with ID accordion.


When you look at the javascript you see that some javascript is registered when the page loads.Go back to the <script> tag in the PageHead content place holder. The _spBodyOnLoadFunctionNames.Push function registers the custom javascript function Intialize() when the page loads.

//Entry point for our code
_spBodyOnLoadFunctionNames.push("Initialize");


This function gets a reference to the context of the SharePoint site. The current site and its lists are loaded. Like in the ClientOM1.aspx page, the execQueryAsync function executes asynchronously and needs a reference to a function that needs to be called when the function returns successfully from the server, and a reference to a function that needs to be called when the call to the server failed.  
function Initialize() {
   var context = new SP.ClientContext.get_current();

   this.site = context.get_web();
   context.load(site);

   this.lists = site.get_lists();
   context.load(lists);

               
   context.executeQueryAsync(
       Function.createDelegate(this, this.onSuccess), 
       Function.createDelegate(this,
          this.onQueryFailed));
}
Look at the onSuccess() function. It calls the LoadListBox() function to display all lists from the SharePoint site
function onSuccess(sender, args) {
   LoadListBox();
}
The onQueryFailed load displays a popup containing the error message
function onQueryFailed(sender, args) {
   alert('request failed ' + args.get_message() +
         '\n' + args.get_stackTrace());
}
The LoadListBox() function executes some JQuery to add an event handler to the list box and to enumerate through the SharePoint lists.Take a look at the code in the LoadListBox() function. It iterates through the collection of SharePoint lists by using the lists.getEnumerator() function. The list title and the list id are used to a list item to the list box for every single SharePoint list
function LoadListBox() {
  //handle the change event
  $("#ListBox1").change(onSelectChange);

  var listEnumerator = this.lists.getEnumerator();

  //iterate though all of the items
  while (listEnumerator.moveNext()) {
     var listItem = listEnumerator.get_current();
     var listId = listItem.get_id().toString();
     var listTitle = listItem.get_title();

     //add the item to the ListBox using jQuery
     $("#ListBox1").append('');
  }
}

When the user selects another list in the list box, the onSelectChange() function is executed. This function calls the BuilTable() function passing the title of the selected SharePoint list
function onSelectChange() {
   BuildTable($("#ListBox1 option:selected").text());
}

The BuildTable() function also executes some JQuery code that builds the accordion:
function BuildTable(ListName) {
  var categoryId = "X" + $("Select#ListBox1").val();

  //add a new section if it doesn't exist
  if ($("#" + categoryId).length == 0) {
     if ($("#accordion").length == 0) {
        alert('accordion not found2');
     }
     $("#accordion").append("

" + ListName + "

"); } //Add the item $("#" + categoryId).append('

' + ListName + '

'); //set the accordian style $("#accordion").accordion('destroy'); $("#accordion").accordion({ header: "h3" }); }
When the application page runs in the context of SharePoint, clicking the button will execute the javascript that calls the client object model.
This sample page only adds an accordion for each list containing the list title but you can easily add functions to retrieve information from the selected list using JQuery and the client object model.
Build the project and deploy it to the SharePoint site.Open an internet browser and navigate to your SharePoint site.
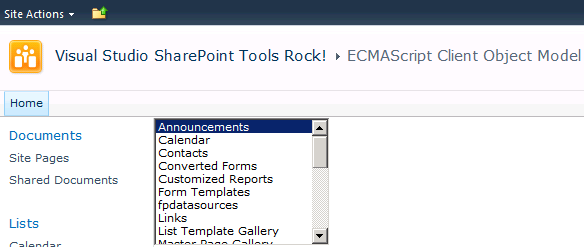
Navigate to the /_layouts/HelloClientOM/ClientOM2.aspx page. When the page loads, the Initialize() function runs, and the list box is populated with the lists in the current SharePoint site

Select one or more lists in the list box. An accordion for each list is added to the <DIV> element.

Sharepoint 2013 Sandboxed Solution example

Sharepoint 2013 Tutorials Sandboxed Solution example

This Sharepoint 2013 example is about sandboxed solutions.Sandboxed Solutions are SharePoint Solution Package files (WSP files)Sand box soultions  are limited in functionality and use limited server resourses.
  • The limited functionality of sandboxed solutions depend on process isolation and limited code access security of the sharepoint site.
  • The resources used by sandboxed solutions are limited by process monitoring, logging and log aggregation.
  • This tutorial  shows you how you can go through the install of a sandboxed solution and how you can run something in the sandbox.
  • The Visual Studio 2010 Tools for SharePoint 2010 provides a project template for the development of a sandboxed solution.
  • A developer can develop sandboxed solutions using this templates.

Step 1 : Open Visual Studio 2010.

Create a new project for an event receiver. When the creation wizard pops up, you have to specify the URL to your SharePoint site, but you also have to indicate whether you want to create a sandboxed solution or not.

Open the SampleSandboxedWebPart project in Visual Studio 2010.
Select the project in the Solution Explorer and look at the Properties window. The Sandboxed Solution property is set to true in case of a sandboxed solution.The project has a property Sandboxed Solution that can be set to true. Based on this property the environment controls the Intellisense to let you know what’s available to you in a sandboxed solution.

Change this property to False.Open the SampleSandboxedWebPart.cs file.Place the cursor at the end of the CreateChildControls() method and start entering SPSecurity.Run. Notice the Intellisense which means that you are allowed to do this.

Remove the line of code again.In the project properties turn the Sandboxed Solution property back on.Return to the code and type SPSecurity.
You will see that this is not available anymore.

But when you continue typing in SPSecurity, Intellisense will let you add RunWithElevatedPrivileges.
When a sandboxed solution is deployed, it is not deployed to the farm solution store but to the Solution gallery on site collection level. The web part doesn’t contain much functionality. It only displays a label containing the current date and time.Right-click the project in Solution Explorer and choose Deploy. Open an internet browser and navigate to the Site Settings page of your SharePoint site.

You can see that the SampleSandboxedWebPart solution is available in the Solution gallery.

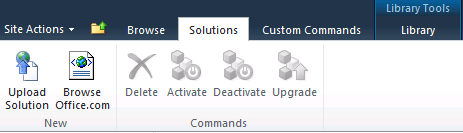
From within here you can also upload sandboxed solutions via the Upload button in the Solutions tab. Notice that you can also activate and deactivate features within the solution here.Choose the Solutions hyperlink in the Galleries section.


  • A dialog opens where you can browse to the solution package. 
  • The dialog also displays a ribbon with an Activate button.Click it if you also want to activate the feature(s) inside the solution.
  • Once the features activated, you can add the web part in a sandboxed solution to a SharePoint page.Return to the home page of your SharePoint site and turn it in Edit mode.You can find the web part in the Sandbox Sample category.Place it on the page
  • Not everything is allowed when working with sandboxed solutions. 
  • You cannot deploy application pages for example. 
  • And when working with web parts, which is allowed in sandboxed solutions, there are certain things that you cannot do like running with elevated privileges. 
  • You will be able to upload such sandboxed solutions and you will be able to activate its features but the code will be blocked by the UserCode service, otherwise known as the sandbox. 
  • It’s the UserCode service that controls what is allowed and what not when running in a sandbox.
  • Return to Visual Studio 2010 and open the BadSandboxWebPart from the starter files.
  • This web part does something that is not allowed when working with sandboxed solutions. 
  • Open the BadSandboxWebPart.cs file to view the code. In sandboxed solutions you are not allowed to run with elevated privileges


  • Upload the solution package to the Solution gallery. When it is uploaded, you can click the Activate button. 
  • SharePoint will not stop you from activating the features inside the sandboxed solution.
  • When you try to add the web part to a SharePoint page in your site, you will find the web part in the Web Part gallery.
  • When the web part is added to the page, an error message will be displayed that it couldn’t load the CodeToRunElevated type.
  • When you have a number of sandboxed solutions running in your site collection, you will see that resource points are accumulated. 
  • Once the quota limit is reached, all sandbox solutions will stop running until the next  day.

Go back to the Solutions gallery and take a look at the resource quota.
Next to each sandboxed solution you will also see the resource usage so that you can check which is a badly designed solution.

Sharepoint 2010 Business Connectivity Services Examples


Business Connectivity Services Step by Step Tutorial in Sharepoint 2010 or 2013with Example

  • In this tutorial of sharepoint 2010 or 2013 i will explain BCS (Business Connectivity Services)
  • BCS is actually a platform that provides a SharePoint-based framework for creating composite applications
  • This composite applications  are built by combining services and functionality from other enterprise applications to address the collaborative needs of users.
  • These composite applications use the Office client user interface in addition to the functionality of the application. 
  • This helps people perform their tasks within the familiar user interface of the Office and SharePoint Server systems, 
  • BCS allows people to take actions and make decisions within the context of the problem at hand
  • In this tutorial we are using AdventureWorks sample database in SQL Server 2008 or 2008 R2
Lets now begin the step by step tutorial in sharepoint 2010

STEP 1:
  • First  you have  to check whether  the Business Connectivity Service running in SharePoint Central Administration.
  • Now Open SharePoint Central Administration and Click Application Management in the Quick Launch
  • From the  Service Applications section select the Manage Service Applications hyperlink. and locate Business Connectivity Service. and check if the status to check whether the service is started or not
STEP 2:
  • Open SharePoint Designer 2010.and from  left pane choose the External Content Types collection. 
  • The designer will take some time to load all necessary data 
  • Click the External Content Type button in the New group on the ribbon.
  • Click on the New External Content Type hyperlink next to Name. Give your content type a name like Contacts.
  • SharePoint Designer presents you a form where you have to fill out some information before the external content type can be created.
  • This name will automatically be taken over for the display name but you can change it if you want.
  • Set the namespace to 20Fingers2Brains ..you can name it anything as you want.
  • Select Contact from the dropdown next to Office Item Type.
  • You can also decide whether the list can be taken offline or not. 
  • You can work with your SharePoint site offline using the SharePoint Workspace 2010 application, which is part of the Office client tools
  • An external content type exposes data from an external data source, like a SQL server table, in SharePoint 2010. You can create an external content type using SharePoint Designer 2010
  • It involves no code at all. In this example we are going to expose the Contacts table from the AdventureWorks SQL Server database into SharePoint 2010
STEP 3:
  • The next step is to define the data source to which you want to connect
  • Find the panel External Content Type Operations right under the External Content Type Information panel.

  • Click the hyperlink at the bottom of the panel.
  • Click the Add Connection button.
  • Choose SQL Server from the popup.Click the OK button.

STEP 4:
  • Expand the AdventureWorks treeview. Notice that you can choose between the different tables, views and routines.
  • Right-click the Contact table and notice all the different methods that can be associated with the external content type.
  • When the data source is defined you can start with the definition of the external content type. One of the things you will have to do is define the methods that will be associated with the external content type
  • Choose Create All Operations. This will create all the Finds, Updates and Delete methods.
  • A wizard opens where you will have to answer some questions.
  • Click the Next button.
  • In the next screen you will be able to define the mappings between the columns of the SQL Server table and the fields of the Contact table type. At the bottom you see a number of errors and warnings you need to address before you will be able to create the operations.
  • Select the LastName column of the SQL Server table and map it to the LastName column of the Contact table.
  • Check the Show in Picker check box.
  • In the Office Property dropdown it is indicated that a custom property will be created. Choose LastName from the dropdown.
  • Select the rowguid column of the SQL Server table. Make sure the Required check box is unchecked.
  • You can uncheck all other columns that you don’t want to show up in your external content type.
  • Leave all other columns as is.

STEP 5:
  • Click the Add Filter Parameter button. A new filter parameter is created.
  • Select the (Click to Add) hyperlink on the right of the screen. A dialog opens.
  • Choose Limit from the Filter Type dropdown and leave ContactID selected in the Filter Field dropdown. Click the OK button.
  • In the next screen of the wizard you are able to define a filter to avoid that too many data is returned to SharePoint.

  • Right under the filter in the Properties pane, set the Default Value to 100.
  • Click the Finish button to accept the changes.
  • Click the Save button to save the changes. It takes some time before the external content type is created.
  • On the ribbon you can see that you can do different things with this new external content type: you can edit the different operations, but you can also create a list and its forms for this external content type, and create a profile page.

STEP 6:
  • In the Business Connectivity Service you can check the external content types that are created. If you want to create profile pages for your external content types, you have to change a configuration setting of theBusiness Connectivity Service here.
  • Return toSharePoint Central Administration.
  • Click Application Management in the Quick Launch.
  • In the Service Applications section select the Manage Service Applications hyperlink.
  • Scroll down to locate and select the Business Connectivity Service.
  • You can see that the Contacts external content type is there.

  • Select the Edit button from the ribbon.
  • Select the Configure button.
  • The only thing to do in the wizard is to enter the URL to your SharePoint site,
  • Now you can select one of the external content types listed and choose Create/Upgrade Profile Page
  • This means that you can create profile pages from within Central Administration or in SharePoint Designer .

STEP 7
  • Now you are going to create a list based on the external content type you just created.
  • Open an internet browser and navigate to your SharePoint site.
  • Choose More Options from the Site Actions menu.
  • Select the Lists tab on the right.
  • Pick the External List template from the wizard and click the Create button.
  • This brings you to a familiar creation page where you can fill out the name of the new list. Give your list a name, like f.e. ECT Contacts.
  • In the Data source configuration section select the right picker button.
  • The External Content Type Picker opens. Choose your content type from the list and click the OK button

When the Contacts list is created, it opens in the All Items view. You can do all the things you can do with a native SharePoint list: select items, view items, edit items, define views,

Select an item and choose Edit.Change the phone number and save your changes.In SharePoint 2010 making changes to external data is much easier than in SharePoint 2007

Notice your change in the All Items view. But your changes are also saved back to the Contacts table in the AdventureWorks database. 

BI Analysis Integration Reporting Serivces with Sharepoint and Excel from Microsoft BI


Microsoft Technologies for Business Intelligence MSBI

Understanding the terminology that surrounds BI is important as you embark upon your BI project. The table below outlines key terms that are used in the BI arena which are as follows
  1. SSIS – SQL Server Integration Services
  2. SSAS – SQL Server Analysis Services
  3. SSRS- SQL Server Reporting Services
  4. Microsoft Office SharePoint
  5. Microsoft Excel
SSIS – SQL Server Integration Services
  1. SSIS is an ETL tool that is responsible for moving data around the business and transforming or changing the data.
  2. There are a wide range of transformations that can be performed by SSIS. These can involve changing the format of the data or converting data from one data type to another.
  3. You can also perform lookup operation to add data to a destination based on a lookup from a third data source.
  4.  For example, based on postal code, look for suburbs from the U.S. Postal Service.
  5. While SSIS can be used to populate a data warehouse, it can also be used to perform ad hoc data transfers between different systems.
  6.  It can also be used to move objects between different instances of SQL Server. The first interaction that people have with SSIS is when they use the Import/Export wizard.
  7. Not only will this provide the ability to define data sources and destination, but you can also perform transformations within the wizard.
  8. The wizard also prompts you to save the detail of the wizard as an SSIS package that can be edited later within SSIS. 


SSAS – SQL Server Analysis Services
  1. SSAS provides OLAP databases and data mining capabilities. As the need for data increases for business analysis within an organization, many BI IT professionals are seeing the value that SSAS can bring to providing data analysis in an efficient manner within a BI infrastructure.
  2. It also provides the ability to add calculated values to a cube known as calculated members. This use Multidimension Expression (MDX) language to create calculated members that will add value to the cube.
  3. MDX can also be used to define KPIs that provide high visualisation of key business metrics. Another component of SSAS is data mining.
  4. This is perhaps one of the most underused technologies within the entire SQL Server BI stack.
  5. The power to find patterns and trends in the data can help companies make commercial decisions about the future.
  6. Excel 2007 now has a data mining add-in that can extend the reach of this technology to the end user.
  7. Understanding how data mining works will be an important aspect of Analysis Services as it grows in popularity. 


SSRS- SQL Server Reporting Services
  1. SSRS provides you with the capabilities to design, deploy, manage and deliver end-user reports. The design capabilities is available to all users of the organisation as you can use Business Intelligence Development Studio to create reports.
  2.  Report Designer can be made available to the end user to create their own reports.
  3.  Report Manager is a Web-based front-end that enables users to view reports and allow report administrators to manage reports. You can also automate the delivery of reports. 


Microsoft Office SharePoint
  1. Although Microsoft Office SharePoint Services (MOSS) is not a part of the SQL Server BI stack, it would be remiss not to acknowledge the growing importance that MOSS has in delivering BI to the end user.
  2.  MOSS can act as a central repository of business information within an organization. This can include the storage of documents and images.
  3. You can also set up calendars and newsgroups that an organization can use to exchange information.
  4.  You can now integrate SSRS with MOSS during the installation of Reporting Services. This will enable you to host and store reports within MOSS.
  5.  Furthermore, it was announced by Microsoft in January 2009, that Microsoft Office Performance Point Server would be integrated into SharePoint Services.
  6.  This would provide greater capabilities for providing digital dashboards and scorecards within MOSS. 


Microsoft Excel
  1. Microsoft Excel is a popular client tool for BI solutions. You can export SSRS reports to Excel. However, its power is evident in the way that it integrates with SSAS.
  2.  You can connect to SSAS cubes by using Excel and create pivot table reports.
  3. Furthermore, you can also download a number of Excel add-ins such as the Analysis Services Add-in for Excel and the Data Mining Add-in for Excel.
  4.  These add-ins provide more sophisticated integration with Analysis Services than the pivot table alone.