Showing posts with label MVC Examples. Show all posts

Editor Templates Example in ASP.NET MVC

Editor Templates Example in ASP.NET  MVC
  • We commonly use HTML helpers and model binding while working with MVC Razor.
  • MVC framework smartly renders HTML for different type of data like textbox for string or int and checkbox for bool proeprty, when EditorFor or EditorForModel helper is used to render the control.
  • We often have requirement where we want something more like rendering dropdown for model's property of type enum.
  • This is where editor template comes to rescue the situation.
  • In this example, we will render a dropdown control for enum type model property.
ViewModel:
        using System;
        using System.Collections.Generic;
        using System.Linq;
        using System.Web;
        using System.ComponentModel.DataAnnotations;

        namespace BindingDropdownToEnum.Models
        {
            public class DropdownModel
            {
                [UIHint("DropDownList")]
                public players playerList { get; set; }
            }

            public enum players
            {
                Fabregas = 1,
                Rocisky = 2,
                Ozil = 3,
                Cazorla = 4
            }
        }
    

In the above view model we have created an enum named players. We have created one  class which has one poperty of type players (i.e. enum). We have used DataAnnotation attribute UIHint to indicate MVC framework the editor template to pick while rendering control for the property. In the above example, we are asking MVC framework to use DropDownList cshtml file under Editor Template folder.

View:
    @model BindingDropdownToEnum.Models.DropdownModel

    @{
        ViewBag.Title = "DropdownBinding";
    }

    <h2>DropdownBinding</h2>

    @Html.EditorForModel()

We have used EditorForModel to render controls for model properties.

EditorTemplate:

    @using BindingDropdownToEnum.Models

    @Html.DropDownList("playerList", Enum.GetValues(typeof(players)).Cast<players>().Select(c => new SelectListItem { Text = c.ToString(), Value = c.ToString() }))

In the above EditorTemplate we have rendered a dropdownlist control using the enum. When the view is rendered, the UIHint attribute indicates MVC framework to use EditorTemplate to render the control.
                                       The editor templates are created under EditorTemplates folder which is under Shared folder. Thus using EditorTemplates we can render any control for any type of property using EditorForModel or EditorFor HTML helper.

Screenshots:


The above textbox is rendered when UIHint attribute is not used. The below screenshot shows the result with using UIHint attribute.


Conclusion:


  • Thus the editor templates can be used with EditorFor or EditorForModel helpers.
  • The editor templates can be used to render any type of control for model property.

Upload multiple files to database using ASP.NET MVC

Upload multiple files to database using ASP.NET MVC
  • In this article we will see how to upload multiple files to database. 
  • The main trick is to select multiple files and post it to the controller's action method.
  • The saving code will be same, but will iterate for each file.
Demo

Database:


We have a simple table named UploadedFiles. We have three columns in the table:


  • FileId - This is primary key identity column.
  • ContentType - This column stores the file type.
  • ImageBytes - This column is of type varbinary and stores file bytes.

ViewModel:

       using System;
        using System.Collections.Generic;
        using System.Linq;
        using System.Web;

        namespace FileUpload.ViewModel
        {
            public class FileUploadViewModel
            {
                public IEnumerable<HttpPostedFileBase> File { get; set; }
            }
        }
    
We have created a IEnumerable property of type HttpPostedFileBase to support multiple uploads. The HttpPostedFileBase type property contains file stream and file information when posted to the controller action.

View:


    @model FileUpload.ViewModel.FileUploadViewModel

@{
    ViewBag.Title = "FileUpload";
}

<h2>FileUpload</h2>


    <div>
        @using (Html.BeginForm("UploadMultipleFiles", "FileUpload", FormMethod.Post, new { @enctype = "multipart/form-data" }))
        {
            @Html.TextBoxFor(c => c.File, new { type = "file", multiple = "true" })
            <input type="submit" style="margin-left:40px;cursor:pointer;" id="upload" value="Upload"/>
        }
    </div>

We have referred the above View model in the view. We have used TextBoxFor helper to render file control using model binding. We have used htmlAttribute object to set multiple property of control to true which allows to select multiple files.
            We have created a form using BeginForm helper. We have also created a submit button. When form is submitted the files are posted to UploadMultipleFiles action method of FileUpload controller

Controller:

       [HttpPost]
        public ActionResult UploadMultipleFiles(FileUploadViewModel fileModel)
        {
            FileUploadService service = new FileUploadService();
            foreach (var item in fileModel.File)
            {
                service.SaveFileDetails(item);
            }
            return View("FileUpload");
        }
    
We have accepted the object of our View model as a parameter. This object has the posted files. The File property of the FileUploadViewModel class is iterated for multiple files and each file is saved to database using SaveFileDetails method.

Service:
       public class FileUploadService
    {
        public void SaveFileDetails(HttpPostedFileBase file)
        {
            UploadedFiles newFile = new UploadedFiles();
            newFile.ContentType = file.ContentType;
            newFile.ImageBytes = ConvertToBytes(file);
            using (FileUploadEntities dataContext = new FileUploadEntities())
            {
                dataContext.UploadedFiles.AddObject(newFile);
                dataContext.SaveChanges();
            }
        }

        public byte[] ConvertToBytes(HttpPostedFileBase file)
        {
            byte[] imageBytes = null;
            BinaryReader reader = new BinaryReader(file.InputStream);
            imageBytes = reader.ReadBytes((int)file.ContentLength);
            return imageBytes;
        }
    }
    
The SaveFileDetails saves the file data to the database. The ConvertToBytes method converts the stream to file bytes.

Conclusion:


  • We need to set the multiple attribute to true of the file control.
  • The view model's property should of type IEnumerable.
  • Iterate on the posted files and save it to the database.


Screenshots:


Ways to call Stored procedure using Entity Framework in ASP.NET MVC3 Razor

Ways to call Stored procedure using Entity Framework in ASP.NET  MVC3 Razor
  • In this article we are concentrating on two ways by which we can call stored procedure using entity framework.
  • Entity Framework performs below expectation when fetching large data, so often we use stored procedure to fetch data.
  • In the application where one has used entity framework, one can use entity framework itself to call stored procedure.

Demo

Lets see what are these two ways:

Way 1:
This is probably the simplest method to call a stored procedure with minimal effort.
We have created a simple stored procedure which fetches the registered user to the application. The stored procedure looks like below:
In the above image above is the stored procedure and below is the result that stored procedure returns.

        using (SampleAPPEntities dataContext = new SampleAPPEntities())
            {
                List<Register> userList = dataContext.ExecuteStoreQuery<Register>("RegisteredUsers").ToList();
            }
    

In the above code, we have created a data context object. We have used ExecuteStoreQuery method of data context to fetch the data. The method accepts a parameter which is the name of the stored procedure to call. We are retuning list of type Register class which maps to the Register table in database whose data we are retreiving using stored procedure.


Way 2:
In this method, we first add stored procedure to the .edmx file. The function inport for the stored procedure is created, function import creates a function which uses the stored procedure.

Step 1: Adding stored procedure to EF
Open the edmx file, right click on it, a dialog box will appear as shown below:


Click on Update Model from Database option which will open another dialog box as shown below:

Select the stored procedure and click the Finish button. This will add the stored procedure to the solution or to the edmx file.


In the above image you could see RegisteredUsers added under Stored Procedures folder.

Step 2:
In this step we will see how to add funtion import for the stored procedure.
Right click on the stored procedure added, this will open a window as shown below:
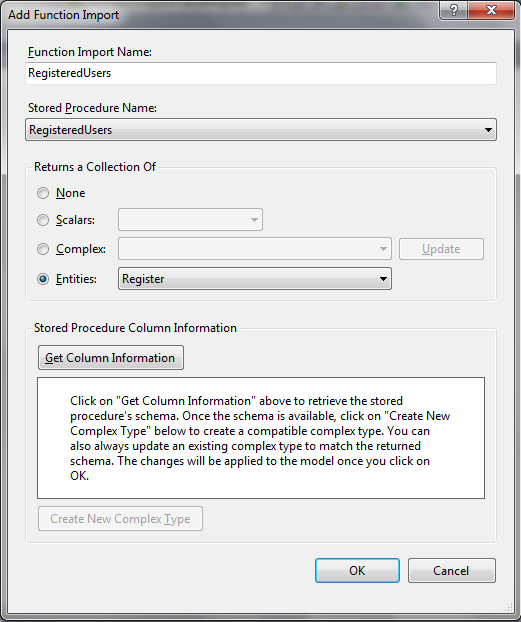
click on the Add Function Import option, this will open another window as shown below:

The function import name field is pre populated, you can give the function name you want, the stored procedure dropdown has the stored procedure for which you want to add function import.
Select the Entities radio button and select the entity to which you want to map the stored procedure. The stored procedure will return the result of the selected entity type. On clicking ok the funtion import will be created for stored procedure.

        using (SampleAPPEntities dataContext = new SampleAPPEntities())
            {
                List<Register> userList1 = dataContext.GetRegisteredUsers().ToList();
            }
    
We can use the funtion import created to call the stored procedure to get the data from Database.
So, these are the two ways by which the stored procedure can be called using entity framework.

Simple Register and Login application in MVC3 Razor with Database interaction

  • In this article we will create a simple project or application which demonstrates how to create simple register and login forms with database interaction.
  • We will use DataAnnotation to validate form input.
  • We will use EDMX and database first approach. In Database first approach, we first create our database and then update the EDMX with the entities.
  • We will create two forms. One for registering for application and other for login into the application.
  • We have divided the article into two parts. The database part shows the database structure and EDMX entities. The code part shows how to create forms and classes and how to save details.

Watch Video


Part 1

Part 2
Part 3
Part 4

Database :

We have created a Database named LoginTp. We have one table in our database to store User's register Details. We have named it as UserDetails. It looks like below :


In the table, UserId is our primary key and is identity(1,1). We are also storing user's firstname, lastname, dob, city, email and password.

We will update our EDMX with this database to create entities.
To see how to update EDMX from DB follow the link :


After updating EDMX or model from Database, our EDMX file looks like below :


The entity is created in the EDMX. We will use this EDMX to interact with the database.

Code :


We have divided the code part based on forms i.e. Register and Login. Lets start with Register Form.


Register :


ViewModel :


We have created a separate folder to hold our ViewModel. We have created a class file named Register.cs which holds properties to render on Register form. The class file looks as below :


using System;
using System.Collections.Generic;
using System.Linq;
using System.Web;
using System.ComponentModel.DataAnnotations;

namespace Logintp.ViewModel
{
    public class Register
    {
        [Required]
        public string FirstName { get; set; }

        [Required]
        public string LastName { get; set; }

        [Required]
        [DataType(DataType.Date)]
        [DisplayFormat(DataFormatString = "{0:dd.MM.yyyy}")]
        public DateTime DOB { get; set; }

        [Required]
        public string City { get; set; }

        [Required]
        public string Email { get; set; }

        [Required]
        [DataType(DataType.Password)]
        public string Password { get; set; }
    }
}

We have defined above properties to render on form. We have also used DataAnnotation attributes to validate the user's input. We have used Required attribute to make all the fields mandatory to answer. We have used DataType attribute to render input type = "password" for pasword property.

View :


@model Logintp.ViewModel.Register
@{
    ViewBag.Title = "Register";
    Layout = "../Shared/_Layout.cshtml";
    }

<h2>Register</h2>

<div style="color:Black;">@Html.ValidationSummary(true)</div>
<div>
@using(Html.BeginForm("SaveRegisterDetails","Register"))
{
@Html.EditorForModel("Register")
<input type="submit" value="Submit" />
}

</div>
@Html.ActionLink("Login","Login")
<script type="text/javascript">
    $(function () {
        $('#DOB').datepicker({
            onSelect: function (date, value) {
                debugger;
                $('#DOB').val(date);
            },
            dateFormat: 'dd/mm/yy'
        });
    });
</script>

We have used EditorForModel helper for rendering controls for properties defined in our Register ViewModel. We have created a button of type submit, which posts our form.
We have also used BeginForm helper to render form. We have passed two parameters, which are action name and controller name. The action specified in the controller will be called on posting the form. We have used jQuery DatePicker for DOB  property. This will render a datepicker on clicking the textbox rendered for DOB property.

Controller :


//This method is the first to call and renders the Register View.
        public ActionResult Register()
        {
            return View();
        }

        //The form's data in Register view is posted to this method. 
        //We have binded the Register View with Register ViewModel, so we can accept object of Register class as parameter.
        //This object contains all the values entered in the form by the user.
        [HttpPost]
        public ActionResult SaveRegisterDetails(Register registerDetails)
        {
            //We check if the model state is valid or not. We have used DataAnnotation attributes.
            //If any form value fails the DataAnnotation validation the model state becomes invalid.
            if (ModelState.IsValid)
            {
                //If the model state is valid i.e. the form values passed the validation then we are storing the User's details in DB.
                RegisterLogin reglog = new RegisterLogin();
                //Calling the SaveDetails method which saves the details.
                reglog.SaveDetails(registerDetails);
                ModelState.AddModelError("", "User Details Saved Successfully");
                return View("Register");
            }
            else
            {
                //If the validation fails, we are returning the model object with errors to the view, which will display the error messages.
                return View("Register",registerDetails);
            }
        }

The Register action method renders the Register View. The user fills the details and post the form. The form is posted to SaveRegisterDetails method. In this method we validates model state. If the model state is valid then the details are saved else user is displayed with error messages.

Service :


In this class we have wrote code to save the details. We have created a folder named Service which will hold the service classes. We have created a class named RegisterLogin. This class contains SaveDetails method. The class file looks like below.


using System;
using System.Collections.Generic;
using System.Linq;
using System.Web;
using Logintp.ViewModel;
using Logintp.Models;

namespace Logintp.Service
{
    public class RegisterLogin
    {
        //This method accepts object of Register ViewModel class.
        public void SaveDetails(Register register)
        {
            //Creating DataContext object.
            using (LoginTpEntities dataContext = new LoginTpEntities())
            {
                //Creating the UserDetails object which is our entity.
                UserDetails details = new UserDetails();
                details.FirstName = register.FirstName;
                details.LastName = register.LastName;
                details.UserName = register.Email;
                details.Password = register.Password;
                details.City = register.City;
                details.DOB = Convert.ToDateTime(register.DOB);
                //Saving the details.
                dataContext.UserDetails.AddObject(details);
                dataContext.SaveChanges();
            }
        }
    }
}

The service class contains the method or code to save the user details. This we can consider the DataAccess layer as well.
Till this point we have saved the user details. We are done with Register Form. We will see Login form below.


Login :

ViewModel :

public class LoginViewModel
    {
        [Required]
        public string Username { get; set; }

        [Required]
        [DataType(DataType.Password)]
        public string Password { get; set; }
    }

We have created a ViewModel for Login form. We have include two properties.

View :


@model Logintp.ViewModel.LoginViewModel
@{
    ViewBag.Title = "Login";
    Layout = "../Shared/_Layout.cshtml";
}

<h2>Login</h2>

<div style="color:Black;">@Html.ValidationSummary(true)</div>
<div>
@using(Html.BeginForm())
{
@Html.EditorForModel("LoginViewModel")
<input type="submit" value="Login" />
}

</div>

We have used EditorForModel helper again to render controls for the properties in LoginViewmodel. We are posting the form on click of login button.

Controller :

     //This action method renders the Login View.
        public ActionResult Login()
        {
            return View();
        }

        //The login form is posted to this method.
        [HttpPost]
        public ActionResult Login(LoginViewModel model)
        {
            //Checking the state of model passed as parameter.
            if (ModelState.IsValid)
            {
                RegisterLogin login = new RegisterLogin();
                //Validating the user, whether the user is valid or not.
                bool isValidUser = login.IsValidUser(model);
                //If user is valid we are redirecting it to Welcome page.
                if (isValidUser)
                    return View("Welcome");
                else
                {
                    //If the username and password combination is not present in DB then error message is shown.
                    ModelState.AddModelError("Failure", "Wrong Username and password combination !");
                    return View();
                }
            }
            else
            {
                //If model state is not valid, the model with error message is returned to the View.
                return View(model);
            }
        }

        public ActionResult Welcome()
        {
            return View();
        }

The first action method renders the Login form. The login form on submit is posted to the Login Action method. In this method we check the user with username and password combination entered on the login form in DB. If the match is found then user is redircted to Welcome page else error message is shown.

Service :


public bool IsValidUser(LoginViewModel model)
        {
            using (LoginTpEntities dataContext = new LoginTpEntities())
            {
                //Retireving the user details from DB based on username and password enetered by user.
                UserDetails user = dataContext.UserDetails.Where(query => query.UserName.Equals(model.Username) && query.Password.Equals(model.Password)).SingleOrDefault();
                //If user is present, then true is returned.
                if (user == null)
                    return false;
                    //If user is not present false is returned.
                else
                    return true;
            }
        }

The above method validates the presence of username and password combination in database and returns bool value accordingly.

Layout :


<!DOCTYPE html>
<html>
<head>
    <meta charset="utf-8" />
    <title>@ViewBag.Title</title>
    <link href="@Url.Content("~/Content/Site.css")" rel="stylesheet" type="text/css" />
    <script src="@Url.Content("~/Scripts/jquery-1.5.1.min.js")" type="text/javascript"></script>
    <script src="@Url.Content("~/Scripts/modernizr-1.7.min.js")" type="text/javascript"></script>
    <script src="@Url.Content("~/Scripts/jquery-1.8.3.js")" type="text/javascript"></script>
    <script src="@Url.Content("~/Scripts/jquery.ui.datepicker.js")" type="text/javascript"></script>
    <script src="@Url.Content("~/Scripts/jquery.ui.widget.min.js")" type="text/javascript"></script>
    <script src="@Url.Content("~/Scripts/jquery.ui.core.min.js")" type="text/javascript"></script>
    <link href="@Url.Content("~/Content/themes/base/jquery.ui.all.css")" rel="stylesheet" type="text/css" />
</head>

<body>
    @RenderBody()
</body>
</html>

The above is the Layout used. We have added jQuery references for above files to work with jQuery DatePicker.

Snapshots :


Register Form :


Register Form With errors :


Login Form :


Login Form with unmatched Username and Password :


Database Details :


Must Read:

Validate Form using Data Annotation

Sample Register Form in Asp.net MVC3 Razor

Sample Register Form in Asp.net MVC3 Razor

For creating Sample Register Form we have used one controller, two views and one model class.


Watch Video


Following are the Steps :

Step 1 :

Create a new empty internet ASP.NET MVC3 project.

Step 2 :


Creating Controller - Right Click Controller Folder => Add => Controller, a window will open as shown below.


Name the controller as LoginController and choose template as Empty. Click on Add. This will create a LoginController with default Index Action Method as shown below.


Step 3 :
Creating Model - Create a new Model class for our login View.
Right click on Model Folder => Add => New Item. A window opens.        Add a new class file, under Web section and name it as Login.cs as shown below.


After clicking on Add, it will generate a default class file named Login.cs as shown below.


Our Model class is ready. We have to add properties which we are going to use in the Login Form. Add few properties to Login.cs file as shown below.


Our Model class is ready to use. Now we will create a view for Registering.


Step 4 :

Open the LoginController.cs right click inside the Login Method and click on Add View as shown below.


After clicking on Add view, a window will open.


Create a Login View. Do not select any checkboxes. We will create a plain simple view without model and Layout.
If we want we can include the layout and model class later. After creating the view, it will look like below.


Create a form and create controls or markup to display the properties defines in the model.
Include the reference of the model which we created earlier at the top section of the view as shown below.


Points To Remember :

LabelFor - LabelFor allows binding with the model property.
EditorFor - EditorFor renders control depending upon the property. Instead of using editor for, we have other options as well. We can use textbox, dropdown etc.
Form - We gave two attributes to the form. First property is the name of the action method to post the form. The second attribute is the name of the controller.                               button - Submit button is of type submit, on click of this button the form with entire properties is posted to the action method.
        

Lets see how SubmitLoginDetails() action method in controller looks like :


We created an action method of the same name we gave in the Login View's Form. This action method accepts an model object.
When you fill all the fields and press the submit button. The form is posted to this method, and the model object is filled with the values you entered, stored in the model properties. This model object is then passed to View corresponding to the SampleLoginView() action method.


Lets see how SampleLoginView looks like :


This ends our sample login form. This form is simplest of the form without validation.
Before running the application make sure you make changes in the global.asax file, as shown below.


In the Global.asax file, you specify the name of the controller and action method to call, when application runs.
In our case we gave Login as name for controller and Action method.


Flow After Running Application


When you run the application, the debugger hits the Login action method in Login controller as set in the Global.asax file.
In the action method we create an object of the Model class, and pass the object to the view. View renders as following on the browser.


Fill in the details in the form. Suppose we fill the values as below.


After filling the form click on the submit button. It will post the form to the SubmitLoginDetails Action method.


We have passed the model object to the action method. We get all the values we filled in the form, in this object.
This is because, we have binded the form fields with the model properties. This object with form values is passed to the
SubmitLoginDetailsView to display the information.


The Sample Register Form Tutorial Ends Here !

Must Read :

Simple Register and Login application in MVC3 Razor with Database interaction