Showing posts with label MVC 3. Show all posts

Remote Validation attribute in Asp.net MVC Razor

The article explains how to perform remote validation and mandatory settings required for remote validation.
As an example we are remotely validating username property of user with database. We are considering the username scenario in this article. We are going to validate whether the username entered by the user exist in database or not.

First Let us see What is Remote Validation ?
Demo


  • Remote validation allows the application to call the controller actions using client side script.
  • This is extremely useful when you want to perform a back end query without having to perform a full server postback.
  • Remote Validation is basically an ajax call to an action method which queries the database to validate username in our case and returns true or false based on validation result.
  • The process of Remote Validation does not involve postback.


ViewModel:
using System;
using System.Collections.Generic;
using System.Linq;
using System.Web;
using System.ComponentModel.DataAnnotations;
using System.Web.Mvc;

namespace RemoteValidationMVCRazor.ViewModel
{
    public class UserViewModel
    {
        public string Name { get; set; }

        [Remote("IsValidUserName", "Home", ErrorMessage = "Username Exist !")]
        public string UserName { get; set; }

        [DataType(DataType.Password)]
        public string Password { get; set; }
    }
}
    

The above class is our simple ViewModel having three properties. We have applied Remote attribute on UserName property. We need to refer System.Web.Mvc namespace to use Remote attribute.
                                 The first parameter supplied is the Action method name i.e. IsValidUserName which will be called remotely. The second parameter supplied is the name of the controller Home in our case. The third parameter is the error message, this message will be shown if the validation fails.

This ViewModel we are going to use on our View as below:

View:
@model RemoteValidationMVCRazor.ViewModel.UserViewModel
@{
    ViewBag.Title = "Index";
    Layout = "~/Views/Shared/_Layout.cshtml";
}

<h2>Index</h2>


@using (Html.BeginForm())
{
    @Html.EditorForModel("UserViewModel")

    <br /><br />
    <input type="submit" value="Submit" />
}
    

In the above View, we have referred UserViewModel as model of the View. We have used EditorForModel helper to render controls for the property of the ViewModel. We have also created a submit button.

Controller:
using System;
using System.Collections.Generic;
using System.Linq;
using System.Web;
using System.Web.Mvc;
using RemoteValidationMVCRazor.Service;
using RemoteValidationMVCRazor.ViewModel;

namespace RemoteValidationMVCRazor.Controllers
{
    public class HomeController : Controller
    {
        //
        // GET: /Home/

        public ActionResult Index()
        {
            return View();
        }

        public JsonResult IsValidUserName(string UserName)
        {
            RemoteValidationService service = new RemoteValidationService();
            return Json(service.IsValidUserName(UserName), JsonRequestBehavior.AllowGet);
        }

        [HttpPost]
        public ActionResult Index(UserViewModel model)
        {
            RemoteValidationService service = new RemoteValidationService();
            service.SaveUser(model);
            return View();
        }

    }
}
    
We have a simple Controller named HomeController. We have three method inside the controller.
The first ActionResult method is used to render the Index view. The second JsonResult method is the method which will be called remotely to validate username. The third ActionResult method is the method where form is posted i.e. Index with HttpPost attribute. The parameter name UserName in the IsValidUserName method should match the property name in the ViewModel, otherwise the parameter value will be null.


Service Class:
using System;
using System.Collections.Generic;
using System.Linq;
using System.Web;
using RemoteValidationMVCRazor.Models;
using RemoteValidationMVCRazor.ViewModel;

namespace RemoteValidationMVCRazor.Service
{
    public class RemoteValidationService
    {
        public bool IsValidUserName(string username)
        {
            using (RemoteValidationEntities dbContext = new RemoteValidationEntities())
            {
                return !dbContext.Users.Any(user => user.Username == username);
            }
        }

        public void SaveUser(UserViewModel model)
        {
            Users user = new Users();
            user.Name = model.Name;
            user.Username = model.UserName;
            user.Password = model.Password;
            using (RemoteValidationEntities dbContext = new RemoteValidationEntities())
            {
                dbContext.Users.AddObject(user);
                dbContext.SaveChanges();
            }
        }
    }
}
    
The service class has methods which interacts with the database. The first method is IsValidUserName which validates whether DB has user with same username. The Any Linq function returns a boolean value true if DB has username and Vice Versa, and we return negation of that boolean value. That means if user is present we return false as jSon result concluding validation failure, and if user is not present we return true concluding validation success.

Layout:
<!DOCTYPE html>
<html>
<head>
    <meta charset="utf-8" />
    <title>@ViewBag.Title</title>
    <link href="@Url.Content("~/Content/Site.css")" rel="stylesheet" type="text/css" />
    <script src="@Url.Content("~/Scripts/jquery-1.5.1.min.js")" type="text/javascript"></script>
    <script src="@Url.Content("~/Scripts/jquery.validate.min.js")" type="text/javascript"></script>
    <script src="@Url.Content("~/Scripts/jquery.validate.unobtrusive.min.js")" type="text/javascript"></script>
</head>

<body>
    @RenderBody()
</body>
</html>
    
The layout must contains above three script files. These file are must, without these files remote validation is not possible. As we have referred this Layout on our View, we don't need to specify these scripts on View.

Web Config:


We need to have above keys set to true in web.config. If either of these keys are absent or set to false remote validation will not work.

How attribute works:
When the user enters some text in the control i.e. UserName in our case and clicks outside the onblur event is triggered on which IsValidUserName method is called, based on the validation if the user is not present in the database the validation message is shown on UI. Once the onblur event is triggered on making further changes in the same control, the IsValidUserName method is called as soon as you make change to the existing username entered i.e. (onkeyPress).
                            When the onblur event is triggered for the first time and ajax request is made to the IsValidUserName Method. The screenshot below shows the ajax call details. On subsequent changes to username the ajax request is made on keypress.


The ajax call details you can get under Network tab of develper tool.

Points to Remember:


  • Remote Validation is use to validate user input against database without full postback using ajax call.
  • The remotely method called should return boolean value as JsonResult.
  • The three script files must be referred on View or on Layout file i.e. jquery-1.5.1.min.js or higher version, jquery.validate.min.js, and jquery.validate.unobtrusive.min.js.
  • The web.config must contains keys ClientValidationEnabled and UnobtrusiveJavaScriptEnabled set to true under appSettings.
  • The Remote Validation will not work if the Javascript is disabled on the browser.

Also read article at below link which demonstrates how to cover up Remote validation when JavaScript is disabled on browser. 

Editor Templates Example in ASP.NET MVC

Editor Templates Example in ASP.NET  MVC
  • We commonly use HTML helpers and model binding while working with MVC Razor.
  • MVC framework smartly renders HTML for different type of data like textbox for string or int and checkbox for bool proeprty, when EditorFor or EditorForModel helper is used to render the control.
  • We often have requirement where we want something more like rendering dropdown for model's property of type enum.
  • This is where editor template comes to rescue the situation.
  • In this example, we will render a dropdown control for enum type model property.
ViewModel:
        using System;
        using System.Collections.Generic;
        using System.Linq;
        using System.Web;
        using System.ComponentModel.DataAnnotations;

        namespace BindingDropdownToEnum.Models
        {
            public class DropdownModel
            {
                [UIHint("DropDownList")]
                public players playerList { get; set; }
            }

            public enum players
            {
                Fabregas = 1,
                Rocisky = 2,
                Ozil = 3,
                Cazorla = 4
            }
        }
    

In the above view model we have created an enum named players. We have created one  class which has one poperty of type players (i.e. enum). We have used DataAnnotation attribute UIHint to indicate MVC framework the editor template to pick while rendering control for the property. In the above example, we are asking MVC framework to use DropDownList cshtml file under Editor Template folder.

View:
    @model BindingDropdownToEnum.Models.DropdownModel

    @{
        ViewBag.Title = "DropdownBinding";
    }

    <h2>DropdownBinding</h2>

    @Html.EditorForModel()

We have used EditorForModel to render controls for model properties.

EditorTemplate:

    @using BindingDropdownToEnum.Models

    @Html.DropDownList("playerList", Enum.GetValues(typeof(players)).Cast<players>().Select(c => new SelectListItem { Text = c.ToString(), Value = c.ToString() }))

In the above EditorTemplate we have rendered a dropdownlist control using the enum. When the view is rendered, the UIHint attribute indicates MVC framework to use EditorTemplate to render the control.
                                       The editor templates are created under EditorTemplates folder which is under Shared folder. Thus using EditorTemplates we can render any control for any type of property using EditorForModel or EditorFor HTML helper.

Screenshots:


The above textbox is rendered when UIHint attribute is not used. The below screenshot shows the result with using UIHint attribute.


Conclusion:


  • Thus the editor templates can be used with EditorFor or EditorForModel helpers.
  • The editor templates can be used to render any type of control for model property.

Upload multiple files to database using ASP.NET MVC

Upload multiple files to database using ASP.NET MVC
  • In this article we will see how to upload multiple files to database. 
  • The main trick is to select multiple files and post it to the controller's action method.
  • The saving code will be same, but will iterate for each file.
Demo

Database:


We have a simple table named UploadedFiles. We have three columns in the table:


  • FileId - This is primary key identity column.
  • ContentType - This column stores the file type.
  • ImageBytes - This column is of type varbinary and stores file bytes.

ViewModel:

       using System;
        using System.Collections.Generic;
        using System.Linq;
        using System.Web;

        namespace FileUpload.ViewModel
        {
            public class FileUploadViewModel
            {
                public IEnumerable<HttpPostedFileBase> File { get; set; }
            }
        }
    
We have created a IEnumerable property of type HttpPostedFileBase to support multiple uploads. The HttpPostedFileBase type property contains file stream and file information when posted to the controller action.

View:


    @model FileUpload.ViewModel.FileUploadViewModel

@{
    ViewBag.Title = "FileUpload";
}

<h2>FileUpload</h2>


    <div>
        @using (Html.BeginForm("UploadMultipleFiles", "FileUpload", FormMethod.Post, new { @enctype = "multipart/form-data" }))
        {
            @Html.TextBoxFor(c => c.File, new { type = "file", multiple = "true" })
            <input type="submit" style="margin-left:40px;cursor:pointer;" id="upload" value="Upload"/>
        }
    </div>

We have referred the above View model in the view. We have used TextBoxFor helper to render file control using model binding. We have used htmlAttribute object to set multiple property of control to true which allows to select multiple files.
            We have created a form using BeginForm helper. We have also created a submit button. When form is submitted the files are posted to UploadMultipleFiles action method of FileUpload controller

Controller:

       [HttpPost]
        public ActionResult UploadMultipleFiles(FileUploadViewModel fileModel)
        {
            FileUploadService service = new FileUploadService();
            foreach (var item in fileModel.File)
            {
                service.SaveFileDetails(item);
            }
            return View("FileUpload");
        }
    
We have accepted the object of our View model as a parameter. This object has the posted files. The File property of the FileUploadViewModel class is iterated for multiple files and each file is saved to database using SaveFileDetails method.

Service:
       public class FileUploadService
    {
        public void SaveFileDetails(HttpPostedFileBase file)
        {
            UploadedFiles newFile = new UploadedFiles();
            newFile.ContentType = file.ContentType;
            newFile.ImageBytes = ConvertToBytes(file);
            using (FileUploadEntities dataContext = new FileUploadEntities())
            {
                dataContext.UploadedFiles.AddObject(newFile);
                dataContext.SaveChanges();
            }
        }

        public byte[] ConvertToBytes(HttpPostedFileBase file)
        {
            byte[] imageBytes = null;
            BinaryReader reader = new BinaryReader(file.InputStream);
            imageBytes = reader.ReadBytes((int)file.ContentLength);
            return imageBytes;
        }
    }
    
The SaveFileDetails saves the file data to the database. The ConvertToBytes method converts the stream to file bytes.

Conclusion:


  • We need to set the multiple attribute to true of the file control.
  • The view model's property should of type IEnumerable.
  • Iterate on the posted files and save it to the database.


Screenshots:


Ways to call Stored procedure using Entity Framework in ASP.NET MVC3 Razor

Ways to call Stored procedure using Entity Framework in ASP.NET  MVC3 Razor
  • In this article we are concentrating on two ways by which we can call stored procedure using entity framework.
  • Entity Framework performs below expectation when fetching large data, so often we use stored procedure to fetch data.
  • In the application where one has used entity framework, one can use entity framework itself to call stored procedure.

Demo

Lets see what are these two ways:

Way 1:
This is probably the simplest method to call a stored procedure with minimal effort.
We have created a simple stored procedure which fetches the registered user to the application. The stored procedure looks like below:
In the above image above is the stored procedure and below is the result that stored procedure returns.

        using (SampleAPPEntities dataContext = new SampleAPPEntities())
            {
                List<Register> userList = dataContext.ExecuteStoreQuery<Register>("RegisteredUsers").ToList();
            }
    

In the above code, we have created a data context object. We have used ExecuteStoreQuery method of data context to fetch the data. The method accepts a parameter which is the name of the stored procedure to call. We are retuning list of type Register class which maps to the Register table in database whose data we are retreiving using stored procedure.


Way 2:
In this method, we first add stored procedure to the .edmx file. The function inport for the stored procedure is created, function import creates a function which uses the stored procedure.

Step 1: Adding stored procedure to EF
Open the edmx file, right click on it, a dialog box will appear as shown below:


Click on Update Model from Database option which will open another dialog box as shown below:

Select the stored procedure and click the Finish button. This will add the stored procedure to the solution or to the edmx file.


In the above image you could see RegisteredUsers added under Stored Procedures folder.

Step 2:
In this step we will see how to add funtion import for the stored procedure.
Right click on the stored procedure added, this will open a window as shown below:
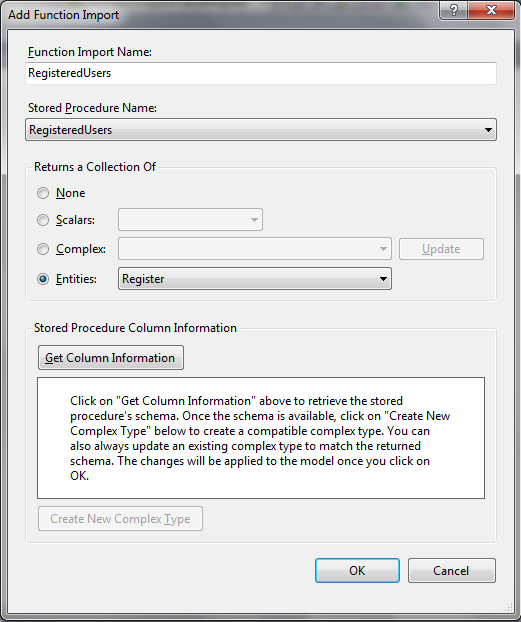
click on the Add Function Import option, this will open another window as shown below:

The function import name field is pre populated, you can give the function name you want, the stored procedure dropdown has the stored procedure for which you want to add function import.
Select the Entities radio button and select the entity to which you want to map the stored procedure. The stored procedure will return the result of the selected entity type. On clicking ok the funtion import will be created for stored procedure.

        using (SampleAPPEntities dataContext = new SampleAPPEntities())
            {
                List<Register> userList1 = dataContext.GetRegisteredUsers().ToList();
            }
    
We can use the funtion import created to call the stored procedure to get the data from Database.
So, these are the two ways by which the stored procedure can be called using entity framework.

BeginForm Helper in MVC 3 Razor

  • We create form to post user's input to the server, ore render the same data from the server on the UI.
  • BeginForm HTML Helper is use to create form on the UI. The HTML helper renders the form tag as markup.
  • The BeginForm helper method has various overloads. 
  • In this article we will see how we can use this helper to render form element.
Example:

Controller:
        //Renders the View with form
        public ActionResult HtmlForm()
        {
            return View();
        }

        //Form is posted to this method.
        [HttpPost]
        public ActionResult HtmlForm(CustomerViewModel model)
        {
            return View();
        }
    

We have used two Action methods for this example. The first method renders the view. The second method is the one where form is posted. The second method has HTTPPost attribute denoting it is the form post and accepts an object of CustomerViewModel class.

ViewModel:

        using System;
        using System.Collections.Generic;
        using System.Linq;
        using System.Web;

        namespace HtmlHelpers.ViewModel
        {
            public class CustomerViewModel
            {
                public int CustomerID { get; set; }

                public string Name { get; set; }

                public string City { get; set; }

                public string Email { get; set; }
            }
        }
    

The above class our ViewModel. The properties defined in this view model are rendered inside the form tag.

View:

        @model HtmlHelpers.ViewModel.CustomerViewModel

        @{
            ViewBag.Title = "HtmlForm";
        }

        <h2>HtmlForm</h2>


        @using (Html.BeginForm("HtmlForm", "Home"))
        {
            @Html.EditorForModel("CustomerViewModel")
            <input type="submit" id="SubmitButton" value="Submit" />
        }
    

We have used BeginForm helper in the above view. The BeginForm helper outputs both the opening <form> and the closing </form>. The helper emits the opening tag during the call to BeginForm, and the call returns an object implementing IDisposable. When execution reaches the closing curly brace of the using satement in the view, the helper emits the closing tag with implicit call to Dispose. The using trick makes the code simpler and elegant.
                                              The submit button posts the form to the HtmlForm action method of Home controller.

Screenshot:


By default BeginForm helper renders the form with POST form method. The BeginForm helper has overload which accepts a FormMethod type parameter using which we can specify POST or GET as type of form method.

Form with GET:

    @using (Html.BeginForm("HtmlForm", "Home", FormMethod.Get))
    {
        @Html.EditorForModel("CustomerViewModel")
        <input type="submit" id="SubmitButton" value="Submit" />
    }

The third parameter specifies whether the FormMethod is POST or GET. By default form is rendered with POST form method. The HtmlForm action method is called when the form is rendered with GET FormMethod.

We can also pass parameter to the Action method using GET. 


    @using (Html.BeginForm("HtmlForm", "Home", FormMethod.Get))
    {
        @Html.EditorForModel("CustomerViewModel")
        <input type="submit" id="SubmitButton" value="Submit" />
    }
    
Controller:
        [HttpGet]
        public ActionResult HtmlForm(int? CustomerID)
        {
            CustomerViewModel model = new CustomerViewModel();
            if (CustomerID > 0)
            {
                model.CustomerID = 1;
                model.Name = "Jack Wilshere";
                model.Email = "Jack@gmail.com";
                model.City = "Arsenal";
            }
            return View(model);
        }
    
ViewModel:
        using System;
        using System.Collections.Generic;
        using System.Linq;
        using System.Web;
        using System.ComponentModel.DataAnnotations;

        namespace HtmlHelpers.ViewModel
        {
            public class CustomerViewModel
            {
                public int CustomerID { get; set; }

                public string Name { get; set; }

                public string City { get; set; }

                public string Email { get; set; }
            }
        }
    
After the form is rendered on UI, we need to provide the CustomerID on the form and click on search button. The form is submitted to HTMLForm action method which accepts the CustomerID parameter. The value entered in the CustomerID field is present in the CustomerID parameter. You need to make sure that the ViewModel property name and the parameter name matches in order to receive the user input.

UI:

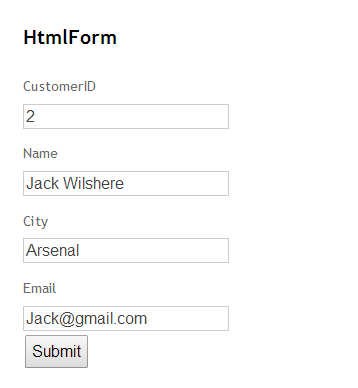
We will enter the CustomerID and will click on Submit button. The form is submitted to Action method with the entered CustomerID. We can use the parameter to fetch desired data from database. The data is displayed on UI as shown below.


There is another overload of this helper which accepts the htmlAttributes.

Overload with htmlAttributes:

    @using (Html.BeginForm("HtmlForm", "Home", FormMethod.Get, new { target = "_blank" }))
    {
        @Html.EditorForModel("CustomerViewModel")
        <input type="submit" id="SubmitButton" value="Submit" />
    }
    

In the above code, you are passing an anonymously typed object to the htmlAttribute parameter of BeginForm. You will also find an htmlAttributes parameter of type IDictionary<string, object> in a different overload. 
              In the above example, we have set target="_blank" using the htmlAttributes. We can set as many attribute values using the htmlAttributes parameter as necessary.

Inside BeginForm:


The BeginForm helper asks the routing engine how to reach the HtmlForm action of HomeController. Behind the scenes it uses the method name GetVirtualPath on the Routes property exposed by RouteTable.

Ajax ActionLink HTML Helper in MVC3 Razor

  • AJAX helpers are available through the Ajax property inside Razor view.
  • Like HTML helpers, most of the methods on this property are extension methods.
  • The ActionLink method of the Ajax property creates an anchor tag with asynchronous behaviour.
  • When the link is clicked, the action method is invoked asynchronously by the Javascript.
  • Ajax ActionLink helper is useful in scenarios where you want to display some information or details on the page without any postback or rediecting to new page.

Asp.net MVC3 Razor has 12 overload of AJAX ActionLink helper. We will see some of the important ones.
In order to use the Ajax features we need to reference jquery.unobtrusive-ajax.min.js file in the Layout or in the view itself.

Example 1:

View
        @{
    ViewBag.Title = "Index";
    Layout = "~/Views/Shared/_Layout.cshtml";
}

<h2>Index</h2>
<div id="myDiv">This is Div element.</div>


@Ajax.ActionLink("Click",
    "AjaxActionLinkDemo",
    new AjaxOptions
    {
        UpdateTargetId = "myDiv",
        InsertionMode = InsertionMode.InsertAfter,
        HttpMethod = "GET"
    })
    

In the above view we have used AJAX ActionLink helper. The first parameter is the link text to be displayed on UI. The second parameter is the name of the Action method to call. The third parameter is the AjaxOptions parameter. The Ajax options parameter specifies how to send the request, and what will happen with the result the server returns. When clicked the AjaxActionLinkDemo action method will be called and result returned by it will be updated to the element ID specified for UpdateTargetId property.

Controller

        using System;
        using System.Collections.Generic;
        using System.Linq;
        using System.Web;
        using System.Web.Mvc;

        namespace AjaxHelpers.Controllers
        {
            public class AjaxHelpersController : Controller
            {
                //
                // GET: /AjaxHelpers/

                public ActionResult Index()
                {
                    return View();
                }


                public ActionResult AjaxActionLinkDemo()
                {
                    return View();
                }

            }
        }
    

The Index is the Action method that renders the view and the link. The AjaxActionLinkDemo is the action method which is called on click of the link.

Snapshot : Before click


Snapshot : After click

The HTML of the View returned by the Action method is rendered on the view from where the Ajax link is clicked asynchronously.


Example 2 : ActionLink with Route values 

View

        @Ajax.ActionLink("Click",//link text
    "AjaxActionLinkDemo",//Action method to call
    new {id="1"},//route value
    new AjaxOptions//Ajax options
    {
        UpdateTargetId = "myDiv",
        InsertionMode = InsertionMode.InsertAfter,
        HttpMethod = "GET"
    })
    

In the above example. we are also passing one parameter to the Action method.

Controller
        public ActionResult AjaxActionLinkDemo(int id)
        {
            return View();
        }
    
The Action method accepts one parameter which will send from view by ActionLink helper as route value.

Example 3: Passing RouteValueDictionary


View

        @{
            ViewBag.Title = "Index";
            Layout = "~/Views/Shared/_Layout.cshtml";
            RouteValueDictionary dic = new RouteValueDictionary();
            dic.Add("id", 1);
            dic.Add("value", "hello world");
    
}

<h2>Index</h2>
<div id="myDiv">This is Div element.</div>


@Ajax.ActionLink("Click",
    "AjaxActionLinkDemo",
    dic,
    new AjaxOptions
    {
        UpdateTargetId = "myDiv",
        InsertionMode = InsertionMode.InsertAfter,
        HttpMethod = "GET"
    })
    

In the above example, we have created a collection of type RouteValueDictionary. In short, we will be passing id and value as parameter to the Action method.

Controller

        public ActionResult AjaxActionLinkDemo(int id,string value)
        {
            return View();
        }
    
The Action method accepts two parameters as per the dictionary defined on the view. You need to make sure that the names of the parameter matches the keys added to the dictionary.

Example 4: Passing the HTMLAttributes

View


        @Ajax.ActionLink("Click",
    "AjaxActionLinkDemo",
    new {id="1"},
    new AjaxOptions
    {
        UpdateTargetId = "myDiv",
        InsertionMode = InsertionMode.InsertAfter,
        HttpMethod = "GET"
    }, new { style = "font-family:comic sans ms;font-size:20px;" })
    

In the above example, we are passing htmlAttributes as well. We are setting the style property of the anchor.

Snapshot

The link style is changes as specified in the htmlAttributes object.

Summary


AJAX ActionLink method renders an anchor element. When the user clicks the link, MVC asynchronously invokes the specified action method via an HTTP POST request. 

The response of that action method can be used to update a specified DOM element, depending on which AjaxOptions are specified.

Read XML file using jQuery in MVC3 Razor


In this article we will see how to read xml file using jQuery in MVC3 Razor.
We have explained two examples:
  • Creating table rows from XML nodes.
  • Populating dropdown using jQuery from XML.
We have used ASP.NET MVC 3 Razor as platform. 
We have added two xml files to the solution, one for each example. We have use jQuery's ajax method to get the file from the location. The nodes from the xml is read using jQuery.

 Create table nodes from XML nodes:

HTML
<table id="target" border="1">
<tr>
<th>ID</th>
<th>Name</th>
<th>City</th>
</tr>
</table>

<input type="button" value="Click" id="readXML" />
    
We have created a table element with headers defined for table and one button. On click of button the XML file is read and table td's are prepared and appended to the table.

jQuery
    <script type="text/javascript">
        $(document).ready(function () {
            $("#readXML").click(function () {
                $.ajax({
                    url: '../../Content/XML/Employee.xml',    // name of file with our data
                    dataType: 'xml',    // type of file we will be reading
                    success: parseXML,     // name of function to call when done reading file
                    error: loadfail     // name of function to call when failed to read
                });
            });
        });

        function parseXML(document) {
            $(document).find("Employee").each(function () {
                var tr = "<tr><td>" + $(this).find("Id").text() + "</td><td>" + $(this).find("Name").text() + "</td>" + "<td>" + $(this).find("City").text() + "</td></tr>";
                $("#target").append(tr);
            });
        function loadfail()
        {
        }
        }
</script>
    
We have used ajax post to read the XML file and then the XML file is read to create table data. On success of ajax post parseXML method is called which accepts the document parameter which is used to access the nodes of XML file.

XML

        <?xml version="1.0" encoding="utf-8" ?>
        <Employees>
          <Employee>
            <Id>1</Id>
            <Name>Cesc Fabregas</Name>
            <City>Barcelona</City>
          </Employee>
          <Employee>
            <Id>2</Id>
            <Name>Thierry Henry</Name>
            <City>Los Angeles</City>
          </Employee>
          <Employee>
            <Id>3</Id>
            <Name>Mesut Ozil</Name>
            <City>London</City>
          </Employee>
        </Employees>
    
We have used the above XML file.

Snapshots:

Before click
After click


Populating dropdown from XML:

HTML:

        <select id="target"></select>
        <input type="button" value="Click" id="readXML" />
    

The HTML has a simple select element which renders empty dropdown list and a button, on click of this button we will read the xml and populate the dropdown list.

jQuery:

        <script type="text/javascript">
            $(document).ready(function () {
                $("#readXML").click(function () {
                    $.ajax({
                        url: '../../Content/XML/Dropdown.xml',    // name of file with our data
                        dataType: 'xml',    // type of file we will be reading
                        success: parseXML,     // name of function to call when done reading file
                        error: loadfail     // name of function to call when failed to read
                    });
                });
            });

            function parseXML(document) {
                $(document).find("player").each(function () {
                    var optionLabel = $(this).find('text').text();
                    var optionValue = $(this).find('value').text();
                    $("#target").append(
    '<option value="' + optionValue + '">' + optionLabel + '</option>'
     );
                });
            }

            function loadfail() {
            }
</script>
    

Using jQuery, on button click we read the xml file. We have used jQuery ajax post to read the xml file. The xml nodes are read on success of ajax post and read data is appended to the dropdown list.

XML:

        <?xml version="1.0" encoding="utf-8" ?>
        <Players>
          <player>
            <value>1</value>
            <text>Thierry Henry</text>
          </player>
          <player>
            <value>2</value>
            <text>Cesc Fabregas</text>
          </player>
          <player>
            <value>3</value>
            <text>Jack Wilshere</text>
          </player>
          <player>
            <value>4</value>
            <text>Mesut Ozil</text>
          </player>
          <player>
            <value>5</value>
            <text>Santi Cazorla</text>
          </player>
          <player>
            <value>6</value>
            <text>Tomas Rocisky</text>
          </player>
        </Players>
    

Snapshots:

Before click

After click


Image Navigation using simple cool navigator in MVC3 Razor

  • In this article we will see how to create a simple Image Navigator using jQuery, CSS and MVC3 Razor.
  • We often see great image navigators on many site. We have used 3 images and used simple jQuery to make it cool navigator. 
  • We have also used CSS3 efficiently to make it look better.
Approach:
We have 3 images on the page. We have used CSS to set their display to none. We have used jQuery ready function to show one out of three images. We have created a three circles out of span element using CSS3. Each circle is linked to the image. On click of the circle shape span, the linked image is rendered.

DEMO

View:

    @{
    ViewBag.Title = "ImageNavigatorFancy";
    Layout = "~/Views/Shared/_Layout.cshtml";
}

<style type="text/css">
.size
{
    width:1100px;
    margin-left:100px;
    height:600px;
    position:absolute;
    display:none;
}
.spanDiv
{
    position:absolute;
    margin-top:610px;
    margin-left:650px;
}
.spanClass
{
    background-color:Orange;
    height:12px;
    width:12px;
    display:block;
    position:absolute;
    cursor:pointer;
    border-radius:5px;
}

</style>
<div>
<img class="size" src="../../Content/Images/arsenal.jpg" alt="arsenal" id="arsenalImage" />
<img class="size" src="../../Content/Images/henry.jpg" alt="henry" id="henryImage" />
<img class="size" src="../../Content/Images/thierry.jpeg" alt="thierry" id="thierryImage" />
</div>
<div class="spanDiv">
<span class="spanClass" id="image1"></span>
<span class="spanClass" id="image2" style="margin-left:20px;"></span>
<span class="spanClass" id="image3" style="margin-left:40px;"></span>
</div>

<script type="text/javascript">
    $(document).ready(function () {
        debugger;
        $("#arsenalImage").show();
        $("#image1").css("background-color", "black");
        $(".spanClass").click(function () {
            var clickedSpanId = $(this).attr("id");
            if (clickedSpanId == "image1") {
                $("#arsenalImage").fadeIn("slow");
                $("#henryImage").fadeOut("slow");
                $("#thierryImage").fadeOut("slow");

                $("#image1").css("background-color", "black");
                $("#image2").css("background-color", "orange");
                $("#image3").css("background-color", "orange");
            }
            else if (clickedSpanId == "image2") {
                $("#henryImage").fadeIn("slow");
                $("#arsenalImage").fadeOut("slow");
                $("#thierryImage").fadeOut("slow");
                $("#image2").css("background-color", "black");
                $("#image1").css("background-color", "orange");
                $("#image3").css("background-color", "orange");
            }
            else if (clickedSpanId == "image3") {
                $("#thierryImage").fadeIn("slow");
                $("#arsenalImage").fadeOut("slow");
                $("#henryImage").fadeOut("slow");
                $("#image3").css("background-color", "black");
                $("#image1").css("background-color", "orange");
                $("#image2").css("background-color", "orange");
            }
        });
    });
</script>

In the above view we have three images with their display attribute set to none using CSS. On ready function we show first image. We have created three span element and gave then circular shape using CSS3. These circular spans are our navigators. On click of these spans the images are toggled.


Snapshots:


Razor Syntax Samples in ASP.NET MVC3 Razor


  • This article provides samples meant to illustrate the syntax for Razor by comparing a Razor example with the equivalent example using the Web Forms View Engine syntax.
  • Each example will highlight a specific Razor concept.

Implicit Code Expression

The code expressions are evaluated and written to the response. This is the typical way how you display value in a view.

Razor:
        <span>@Model.message</span>
    
Web Forms:
        <span><%: Model.message %></span>
    
Code expressions in Razor are always HTML encoded.


Explicit Code Expression


Razor:

        <span>Item@(item)</span>
    
Web Forms:
        <span>Item<%: item %></span>
    

Unencoded Code Expression

In some cases, you need to explicitly render some value that should not be HTML encoded. You can use the Html.Raw method to ensure that the value is not encoded.


Razor:

        <span>@Html.Raw(Model.message)</span>
    
Web Forms:
        <span><%: @Html.Raw(Model.message) %></span>
OR
        <span><%= Model.message %></span>
    

Code Block

Unlike code expressions which are evaluated and outputted to the response, blocks of code are sections of code that are executed. 

They are useful for declaring variables that you may need to use later.

Razor:

        @{
            int x = 123;
            string y = "Hello World";
        }
    
Web Forms:
        <%
            int x = 123;
            string y = "Hello World";
        %>
    

Combining Text and Markup

Razor:
        @foreach (var item in Items)
        {
            <span>@item</span>
        }
    
Web Forms:
        <% foreach (var item in Items){ %>
            <span><%: item %></span>
        <% } %>
    

Mixing Code and Plain Text

Razor looks for the beginning of a tag to determine when to transition from code to markup. Sometimes we need to dislpay plain text immediately after a code block.


Razor:

        @if (showMessage)
        {
            <text>This is plain text</text>
        }
        
        or 

        @if (showMessage)
        {
            @:This is plain text.
        }
    
Web Forms:
        <% if (showMessage) { %>
            This is plain text
        <% } %>
    

There are two ways of displaying plain text in Razor. The first case uses the special <text> tag. The tag itself is not written to the response, only its content. The second approach uses a special syntax for switching from code to plain text.

Escaping the Code Delimiter


We can display @ by encoding it using @@. Alternatively you always have option to use HTML encoding.


Razor:

        My Twitter handle is &#64;hacked

        or 

        My Twitter handle is @@hacked
    

WebForms:
        &lt;% expression %&gt; everyone.
    

Server Side Comment

Razor includes a nice syntax for commenting out a block of markup and code.


Razor:

        @*This is example for server side comment
        @if (showMessage)
        {
            <span>Hello world</span>
        }*@
    
Web Forms:
        <%--
        This is example for server side comment
        <% if (showMessage){ %>
            <span>Hello world</span>
        <% } %>
        --%>
    

Calling a Generic Method


This is really no different than an explicit code expression. Even so many get tripped up when trying to call a generic method. The confusion comes from the fact that the code to call a generic method includes angle brackets, and angle brackets cause razor to transition back to markup unless you wrap whole expression in parentheses.


Razor:

        @(Html.SomeMethod<AType>())
    
Web Forms:
        <%: Html.SomeMethod<AType>() %>


Razor View Engine in ASP.NET MVC3


  • The Razor View Engine is new to ASP.NET MVC 3 and is the default view engine for future.
  • Razor is the response to one of the most requested suggestion received by ASP.NET MVC feature team. 
  • The suggestion is to provide a clean, lightweight simple view engine that did not contain the syntactic cruft contained in the exisiting Web Forms View Engine.
  • The request was finally answered in version 3 of ASP.NET MVC by introducing a new Razor View Engine.


Features:

Razor provides a streamlined syntax for expressing views that minimizes the amount of syntax and extra characters.

1. Compact, expressive, and fluid: Razor syntax makes very simple to express your coding intent. Razor also simplifies markup with an improvement on the Master Pages concept called Layouts. Layouts are more flexible and and requires less code. The @character is used to signify the transition from markup to code, and the Razor engine automatically detected the transition back to markup.

2. Not a new Language: Razor is not a new language. It is a syntax that lets you use your existing .NET coding skills in a template in a very intuitive way.


3. Easy to learn: As Razor is not a new language, it is easy to learn. You need to know HTML, .NET and need to type HTML and hit the @ sign whenever you need to write some .NET code.


4. Works with any text editor: Razor is so lightweight and HTML-focused, we can use any text editor of our choice. Visual studio's syntax highlighting and intelliSense features are nice, but it's simple enough that you can edit it in any text editor.

A simple View :

    @{
    ViewBag.Title = "Home";

    var cars = new string[] { "city", "civic", "accord" };
}

<html>
<head><title>Home</title></head>
<body>
<h1>List of Cars :</h1>
<ul>
@foreach (var car in cars)
{
    <li>@car</li>
}
</ul>
</body>
</html>

The above code sample uses c# syntax. The file has .cshtml extension. Similarly, Razor views which uses the Visual Basic syntax will have .vbhtml file extension. These extensions are important as they signal the code language syntax to the Razor parser.

Code Expressions:


The key transition character in Razor is the @ sign. The single character is used to transition from HTML markup to code and sometimes also to transition black.

       There are two basic types of transitions :

  • Code Expressions 
  • Code Blocks

Code expressions are evaluated and written to the response. We will explain multiple scenarios in Code Expression by different examples.

Case 1:


    <h1>I have @Cars.Length cars.</h1>

The expression @Cars.Length is evaluated as an implicit code expression and the output displayed is 2 on UI. We did not need to demarcate the end of the code expression. In contrast, with a Web Forms View, which supports only explicit code expressions, the above code would look like:

    <h1>I have <%: Cars.Length %> cars.</h1>

Note: Razor is smart enough to know that the space character after the expression is not a valid identifier, so it transitions smoothly back into markup.

Case 2:


    <h1>List of Cars :</h1>
<ul>
@foreach (var car in cars)
{
    <li>@car.</li>
}
</ul>

In above example, the character after the @car code expression is valid code character. Now the question arises that how does razor knows that the dot after the code expression is not meant to start referencing a method or property of current expression. Razor is smart to peeks to next character to find opening angle bracket , which is not a valid identifier and transitions back to markup rendering the li element.
                This ability of Razor to automatically transition back from code to markup is one of its big appeals and is secret sauce in keeping the syntax compact and clean.

Case 3:


    @{
        string rootNamespace = "MyApplication";
    }
    <span>@rootNamespace.Models</span>

In the above case, we expect output to be "MyApplication.Models", instead we get an error saying String does not contain a definition for Models. In this case Razor could not understand out intent and thought that @rootNamespace.Models was our code expression. Razor provides a way to handle this case, it supports explicit code expression by wrapping the expression in paranthesis as shown below :

    @{
        string rootNamespace = "MyApplication";
    }
    <span>@(rootNamespace).Models</span>

The above code tells Razor that the .Models is literal text and not part of the code expression.

Case 4:


    <span>20Fingers2Brains@gmail.com</span>

At first glance, it seems like the above code will cause an error because @gmail.com looks like a valid code expression where we are trying to print out com property of gmail variable. Fortunately, Razor recognize the general pattern of an email address and will leave this expression alone.

Case 5:


        <li>Item_@Item.Length</li>
    
In the above case we have code expression similar to email address, but in this case we mean it to be an code expression. The Razor will print out the text as it matches the email adress pattern whereas we expected Razor to print out Item_3.
                 Once again, parentheses to the rescue! Whenever there is an ambiguity in razor for code expression use parentheses  to explicitly convey about the code expression as shown below:

        <li>Item_@(Item.Length)</li>
    
Case 6:

        <p>
        You should follow
        @20Fingers2Brains, @MVC3, @Razor
        </p>
    

In the above case we want to display some Twitter handles, which starts with @ sign. In this case Razor is going to resolve the implicit code expressions and would fail. In this case where you need to escape the @ sign, you can do so by using a double  @@ sign as shown below:

        <p>
        You should follow
        @@20Fingers2Brains, @@MVC3, @@Razor
        </p>
    

HTML Encoding:
There are numerous scenarios where a view is used to display user input, there is always the potential for cross-site script injection attacks. The good news for us is that Razor expressions are HTML encoded.


        @{
            string message = "<script>alert('hello world');</script>";
        }
        <span>@message</span>
    
The above code will not result in an alert box instead display an encoded message.
However, in cases where you intend to show HTML markup, you can return an instance of System.Web.IHtmlString and Razor will not encode it. All the view helpers in Razor MVC3 return instances of this interface. We can also create an instance of HtmlString or use Html.Raw helper method.

        @{
            string message = "<strong>20Fingers2Brains</strong>";
        }
        <span>@Html.Raw(message)</span>
    
The above code will result in message being displayed without HTML encoding as shown below:

        <span><strong>20Fingers2Brains</strong&gt;</span>
    
This automatically HTML encoding is great for mitigating XSS vulnerabilities by encoding user input meant to be displayed as HTML, but it is not sufficient for diaplying user input within JavaScript.
For Example:


        <script>
            $(function () {
                var message = 'hello @ViewBag.Username';
                $("#message").html(message);
            });
        </script>
    

In the above code, a JavaScript variable message is set to a string, which includes the value of user-supplied user name. The user name comes from a Razor expression.
                         Using the jQuery html method the message is set to be the HTML for DOM element with id message. In above case even thought the user name is HTML encoded withing the message string, there is still a potential XSS vulnerability.
When setting variables in JavaScript by values supplied by user, it is important to use JavaScript encoding not just HTML encoding. We can use @Ajax.JavaScriptStringEncode to encode the input as shown below:


        <script>
            $(function () {
                var message = 'hello @Ajax.JavaScriptStringEncode(ViewBag.Username)';
                $("#message").html(message);
            });
        </script>
    

Code Blocks:
In addition to code expressions, Razor also supports code blocks within a view.
    @foreach (var car in cars)
{
    <li>@car</li>
}

The above block of code iterates over an array and displays a list item for each item in array. The interesting thing about the above statement is how the foreach statement automatically transitions to markup.
                        Code blocks require curly braces to delimit the block of code in addition to an @ sign.

For Example:


        @{
            string message = "Hello world";
            ViewBag.Title = "About Us";
        }
    
The above is the simplest example of code block. Another example of code block where the called method does not return a value (return type is void):

        @{Html.RenderPartial("HomePartial");}
    
We do not require curly braces for block statements like foreach loops and if statements.