Angular 2 with Typescript configuration files


In this post we have added the configuration files which are required to setup the project to work with angular.
There are three files as mentioned below:
1. package.json
2. tsconfig.json
3. systemjs.config.js

package.json


{
  "name": "hpdp-maas",
  "version": "1.0.0",
  "scripts": {
    "start": "tsc && concurrently \"npm run tsc:w\" \"npm run lite\" ",
    "lite": "lite-server",
    "postinstall": "typings install",
    "tsc": "tsc",
    "tsc:w": "tsc -w",
    "typings": "typings"
  },
  "license": "ISC",
  "dependencies": {
    "@angular/common": "2.0.0",
    "@angular/compiler": "2.0.0",
    "@angular/core": "2.0.0",
    "@angular/forms": "2.0.0",
    "@angular/http": "2.0.0",
    "@angular/platform-browser": "2.0.0",
    "@angular/platform-browser-dynamic": "2.0.0",
    "@angular/router": "3.0.0",
    "@angular/upgrade": "2.0.0",
    "core-js": "^2.4.1",
    "reflect-metadata": "^0.1.3",
    "rxjs": "5.0.0-beta.12",
    "systemjs": "0.19.27",
    "zone.js": "^0.6.23",
    "angular2-in-memory-web-api": "0.0.20",
    "bootstrap": "^3.3.6",
    "jquery": "3.1.1"
  },
  "devDependencies": {
    "concurrently": "^2.2.0",
    "lite-server": "^2.2.2",
    "typescript": "^2.0.2",
    "typings":"^1.3.2"
  }
}

    
tsconfig.json


{
  "compilerOptions": {
    "target": "es5",
    "module": "commonjs",
    "moduleResolution": "node",
    "sourceMap": true,
    "emitDecoratorMetadata": true,
    "experimentalDecorators": true,
    "lib": ["es2015", "dom"],
    "noImplicitAny": true,
    "suppressImplicitAnyIndexErrors": true,
    "typeRoots": [
      "../../node_modules/@types/"
    ]
  },
  "compileOnSave": true,
  "exclude": [
    "node_modules/*",
    "**/*-aot.ts"
  ]
}

systemjs.config.js

/**
 * System configuration for Angular samples
 * Adjust as necessary for your application needs.
 */
(function (global) {
    System.config({
        paths: {
            // paths serve as alias
            'npm:': '../node_modules/'
        },
        // map tells the System loader where to look for things
        map: {
            // our app is within the app folder
            app: 'app',
            'bootstrap': 'node_modules/bootstrap/dist/js/bootstrap.min.js',
            'jquery': 'node_modules/jquery/dist/jquery.js',
            // angular bundles
            '@angular/core': 'npm:@angular/core/bundles/core.umd.js',
            '@angular/common': 'npm:@angular/common/bundles/common.umd.js',
            '@angular/compiler': 'npm:@angular/compiler/bundles/compiler.umd.js',
            '@angular/platform-browser': 'npm:@angular/platform-browser/bundles/platform-browser.umd.js',
            '@angular/platform-browser-dynamic': 'npm:@angular/platform-browser-dynamic/bundles/platform-browser-dynamic.umd.js',
            '@angular/http': 'npm:@angular/http/bundles/http.umd.js',
            '@angular/router': 'npm:@angular/router/bundles/router.umd.js',
            '@angular/router/upgrade': 'npm:@angular/router/bundles/router-upgrade.umd.js',
            '@angular/forms': 'npm:@angular/forms/bundles/forms.umd.js',
            '@angular/upgrade': 'npm:@angular/upgrade/bundles/upgrade.umd.js',
            '@angular/upgrade/static': 'npm:@angular/upgrade/bundles/upgrade-static.umd.js',
            // other libraries
            'rxjs': 'npm:rxjs',
            'angular-in-memory-web-api': 'npm:angular-in-memory-web-api/bundles/in-memory-web-api.umd.js'
        },
        // packages tells the System loader how to load when no filename and/or no extension
        packages: {
            app: {
                main: '../../app/main.js',
                defaultExtension: 'js'
            },
            rxjs: {
                defaultExtension: 'js'
            }
        }
    });
})(this);


Create respective files in your project and paste the code. Install the packages listed in package.json file using NPM.

asp net mvc projects source code and video tutorials

Project List in .NET Technologies

#1:Online Shopping Cart Project in ASP.NET
Step By Step Source Code : Project Source Code
To Purchase This Project Drop a Message on fb.com/20fingers2brains
Project Link :Online Shopping Cart in ASP.NET C#
Technologies To Learn In This Project :

#2:Gmail Facebook Chat in ASP.NET C# SQL Server


Step By Step Source Code : 
To Purchase This Project Drop a Message on fb.com/20fingers2brains
Project Link :
Technologies To Learn In This Project :

Explicit Model binding in Asp.net MVC with example


  1. Model binding allows you to map and bind the HTTP request data with a model.
  2. Model binding implicitly goes to work when an action method has parameter.
  3. Model binding can be explicitly invoked using UpdateModel and TryUpdateModel method.

In this article we will discuss if not implicitly how we can trigger Model binding explicitly.

Why Model binding explicitly?

Sometimes there are cases where we need to trigger the model binding process explicitly. The model binding fills the model class with the form values and also outputs ModelState as by-product, that means if the model class has Data Annotation attributes applied for validation, the model binding validates the model properties against Data Annotation attributes and updates ModelState accordingly. If the validation result is success then the ModelState is true else Vice Versa.

So, in short we know we can trigger explicit model binding for filing model object and also to validate model values if Data Annotation attributes are used.

How Model binding explicitly?
MVC provides two methods which accomplished the task of model binding.

  1. UpdateModel
  2. TryUpdateModel

Both the methods perform same task of explicit model binding, only difference is that the UpdateModel method throws exception if ModelState is not valid and TryUpdateModel not.

How to use these methods?

Lets have a model first. We will use a simple Register model class.

Model:
using System;
using System.Collections.Generic;
using System.Linq;
using System.Web;
using System.ComponentModel.DataAnnotations;
using System.Web.Mvc;

namespace SampleRegisterForm.ViewModel
{
    public class Register
    {
        [Required(ErrorMessage="FirstName is Mandatory !!")]
        public string FirstName { get; set; }

        [Required(ErrorMessage = "LastName is Mandatory !!")]
        public string LastName { get; set; }

        [Required(ErrorMessage = "Email is Mandatory !!")]
        public string Email { get; set; }

        [Required(ErrorMessage = "Password is Mandatory !!")]
        public string Password { get; set; }

        [Required(ErrorMessage = "Confirm Password is Mandatory !!")]
        [Compare("Password")]
        public string ConfirmPassword { get; set; }
    }
}
    

The above is our model. We have referred this model class in our View. We will rendering controls for the properties of model inside a form. On submit the form will be posted to controller and there we will perform explicit model binding.

View:
@model SampleRegisterForm.ViewModel.Register
@{
    ViewBag.Title = "Register";
}

<h2>Register</h2>

@using (Html.BeginForm())
{
    @Html.EditorForModel("Register")
    <br />
    <br />
    <input type="submit" value="Submit" />
    <input type="reset"  value="Reset" />
}
    
In the view, we have referred Register model and rendered a form using BeginForm helper. We have rendered controls for model properties using EditorForModel helper. We have two buttons i.e. submit and reset.

UpdateForModel:
[HttpPost]
        public ActionResult Register(FormCollection collection)
        {
            SampleRegisterForm.ViewModel.Register register = new SampleRegisterForm.ViewModel.Register();
            try
            {
                UpdateModel(register);
            }
            catch (Exception e)
            {
                return View(register);
            }
            return View();   
        }
    
We have wrapped UpdateModel method inside a try block. The UpdateModel throws exception if model state is not valid. When the model state is not valid, the UpdateModel throws exception and in catch block we are returning model with errors to the view.

TryUpdateModel:
[HttpPost]
        public ActionResult Register(FormCollection collection)
        {
            SampleRegisterForm.ViewModel.Register register = new SampleRegisterForm.ViewModel.Register();
            if (TryUpdateModel(register))
            {
                return View();
            }
            else
            {
                return View(register);
            }
        }
    
The TryUpdateModel method returns true or false based on the ModelState.

So, this is how you can use UpdateModel and TryUpdateModel for explicit model binding.

Model Binding in Asp.net MVC Razor with example


  1. Model binding is an interesting feature in Asp.net MVC.
  2. It allows you to map and bind the HTTP request data with a model.
  3. The Model Binding reduces the effort to get posted values from the request.
  4. In this article we will see why we need Model binding and how we can achieve it.


Demo

Why Model Binding ?
The first question came to your mind would be why to use Model binding ? How it will better or facilitate coding. We will understand this with an example.

We have an Employee Registeration form, the employee fill in details and clicks on submit button.
In order to save values enter by employee we post form to server on submit click, then by using Request object or by using FormCollection object we fetch values out of it as shown below:


As we can see in above screenshot we have to write so much of code to fetch 5 values from posted form. Suppose your form has 20 fields, then you have to write possibly 20 lines to get all values, which also involves type casting.
                                                     The Model binding makes it easier to get the form values. Lets see how. We must be using a Model in our View.

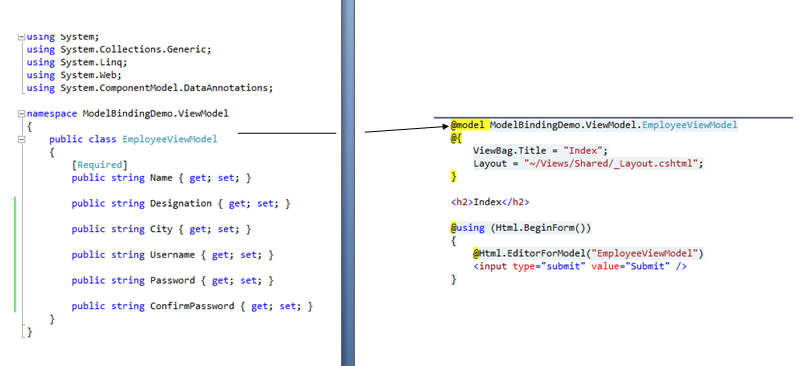
The left part in the screenshot is out ViewModel and we have referred this ViewModel on our View as shown on right. When the form is posted on submit click, we can accept object of this ViewModel as parameter.


So, as we have seen by just accepting a parameter of class which is reffered on View as ViewModel, all the properties are filled. This is magic of Model binding. It reduces the lines of code and associated TypeCasting and makes it very easy to get posted values.

How Model Binding works ?
The next question on your mind would be How this magic thing works? Lets discuss this.
When we have an action with parameter, the MVC runtime uses a model binder to build the parameter. The MVC runtime uses workhorse as DefaultModelBinder. The Asp.net MVC allows us to have multiple model binders registered in the MVC runtime for different types of model.
                                             In case of EmployeeViewModel object, the default model binder inspects the EmployeeViewModel and finds all the Employee properties available for binding. The default model binder can automatically convert and move values from the request into an EmployeeViewModel object. In simple words, when the model binder sees an EmployeeViewModel has a Name property, it looks for a parameter named "Name " in the request. The model binder uses components known as value providers to search for values in different areas of request. The model binder can look at route data, the query string, the form collection.

Whats more in Model Binding ?
Till now we saw example for complex type i.e. EmployeeViewModel which is a class. Similarly model binding also works with primitive types, collections and complex types. We will see example for each of them.

Lets start it !!

Primitive types:
Primitive types are the basic data types like int, short, long etc. We will also include example for string in this type. Lets have a complete new example. We have a simple form with two controls one accepting Name and other Age.

View:

@{
    ViewBag.Title = "Index3";
    Layout = "~/Views/Shared/_Layout.cshtml";
}

<h2>Index3</h2>


@using (Html.BeginForm())
{
    <text>Name:</text>@Html.TextBox("Name")<br /><br />
    <text>Age: </text>@Html.TextBox("Age")<br /><br />

    <input type="submit" value="Submit" />
}
    

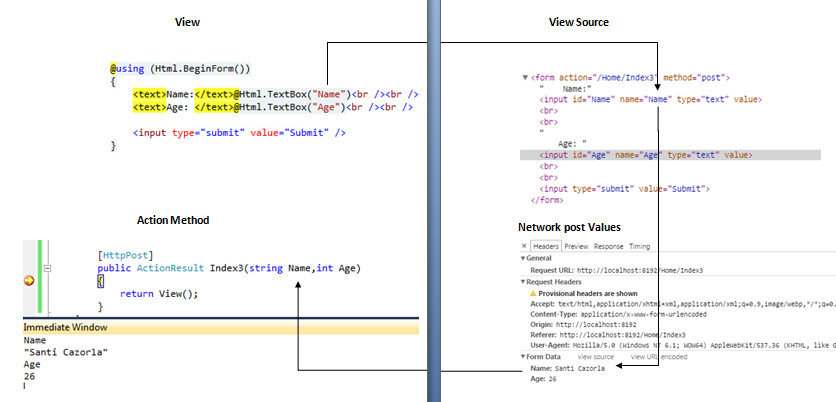
The above View will render two textboxs with Name and Age as their name attribute inside a form. When submit is clicked the form is posted to controller method.

Controller:

[HttpPost]
        public ActionResult Index3(string Name,int Age)
        {
            return View();
        }
    
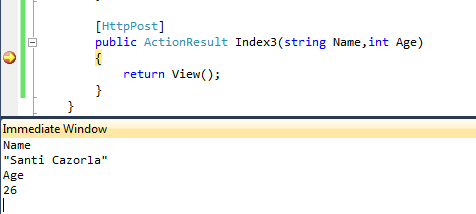
At the action method we have accepted two parameters having name same as defined inside form on View. When the form is posted the model binder inspects the action method parameters, search them in the request and binds it with value in the request. If the parameter name at the action method and control's name property on view differs then model binding will not work to get the value.

The above screenshot from the Network section of Developer tool. Check the Form Data section, it shows two form values posted Name and Age.


Below screenshot shows how the parameters are send when form is posted. 


This sums up the model binding for primitive type. Lets start with collections.

Collections:

In order to demonstrate this example, we will render List of employees on View. The user can udpate values for all of them and on posting form we will bind the list of employees.

View:


@model List<ModelBindingDemo.ViewModel.EmployeeViewModel>
@{
    ViewBag.Title = "Index1";
    Layout = "~/Views/Shared/_Layout.cshtml";
}

<h2>Index1</h2>


@using (Html.BeginForm())
{
    if (Model != null)
    {
        for (int i = 0; i < Model.Count; i++)
        {
        
    <div>
    <table>
    <tr>
    <td>@Html.LabelFor(m => m[i].Name)</td>
    <td>
    @Html.EditorFor(m => m[i].Name)</td>
    </tr>
    <tr>
    <td>@Html.LabelFor(m => m[i].Designation)</td>
    <td>@Html.EditorFor(m => m[i].Designation)</td>
    </tr>
    <tr>
    <td>@Html.LabelFor(m => m[i].City)</td>
    <td>@Html.EditorFor(m => m[i].City)</td>
    </tr>
    </table>
    </div>    
        }
    }   
    <input type="submit" value="Submit" />
    }
    
As we are rendering list of employees, we need to refer model of type List in the View. We have referred Model of type List of EmployeeViewModel as you can see in above code.

Controller:

public ActionResult Index1()
        {
            List<EmployeeViewModel> list = new List<EmployeeViewModel>();
            list.Add(new EmployeeViewModel { City = "City1", Designation = "Sw 1", Name = "Name 1" });
            list.Add(new EmployeeViewModel { City = "City2", Designation = "Sw 2", Name = "Name 2" });
            list.Add(new EmployeeViewModel { City = "City3", Designation = "Sw 3", Name = "Name 3" });
            return View(list);
        }

        [HttpPost]
        public ActionResult Index1(List<EmployeeViewModel> listEmp)
        {
            return View();
        }
    
The first action method prepares a List of employees and send list to View. The second action method is one to which form will be posted. In this action method we are accepting object of  List of type EmpoyeeViewModel. When the form is posted by us after making changes everything will be captured in the list object at client side.

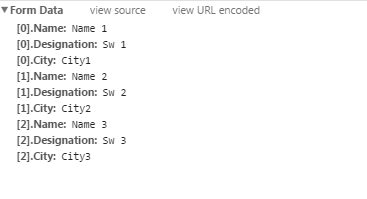
In case of collection the form is posted in above manner with respect to the controls rendered on View. The Model binder detects properties with [0] belongs to same object and [1] belongs to other. So, using the count the model binder is able to bind the collection types.

Instead of using default Model binder, we can create and register multiple model binders for multiple models as per the requirement. We will discuss about Custom Model binding in other article.

Interesting Facts about Model Binding

  1. ASP.NET MVC Model binding allows you to map HTTP request data to a model.
  2. The MVC runtime uses DefaultModelBinder named workhorse to build the parameters.
  3. Model binding implicitly goes to work when an action method has parameter.
  4. Model binding can be explicitly invoked using UpdateModel and TryUpdateModel method.
  5. The by-product of Model binding is ModelState.


So, we came to the end of this article for Model binding. We hope this article proved useful for you. Please share your feedback in comments section.

Enabling client side Data Annotation Validation MVC Razor


  1. Data Annotation makes it easy to validate your model.
  2. Most of the time we implement the validation at server side, i.e. the form is posted to the server and if the model is invalid the response is sent back to the client and user is displayed with error messages.
  3. The same feature can be achieved at client side, that means the form will be validated at client side, before it is posted to the server.
  4. If the form validation passes, the form is posted otherwise the error message is shown.
  5. In this article we will see how to enable the client side validation.

Watch Video

In order to demonstrate, I need to have a ASP.NET MVC project, a controller, couple of Action methods, View and most important a Model. Lets get started.

Model
using System;
using System.Collections.Generic;
using System.Linq;
using System.Web;
using System.ComponentModel.DataAnnotations;
using System.Web.Mvc;

namespace DataAnnotation.ViewModel
{
    public class RegisterViewModel
    {
        [Required]
        public string FirstName { get; set; }

        public string LastName { get; set; }

        [Required]
        public string Email { get; set; }

        [Required]
        public string Password { get; set; }

        [Required]
        public string ConfirmPassword { get; set; }
    }
}
    

We have a Register class as Model. We have defined few properties and marked some of them with Required Data Annotation attribute.

View
@model DataAnnotation.ViewModel.RegisterViewModel
@{
    Layout = "../Shared/_Layout.cshtml";
}

<!DOCTYPE html>

<html>
<head>
    <title>RequiredDemo</title>
</head>
<body>
    <div>
        @using (Html.BeginForm())
        {
            @Html.EditorForModel("Register")
            <br />
            <input type="submit" value="Submit" />
            <input type="reset" value="Reset" />
        }
    </div>
</body>
</html>
    

We have a simple View. We have used EditorForModel helper to render controls for the Model properties. We have used BeginForm helper to render a form. We have Submit and Reset button for the form.

Controller
[HttpPost]
        public ActionResult RequiredDemo(RegisterViewModel model)
        {
            if (ModelState.IsValid)
            {
                return View();
            }
            else
            {
                return View(model);
            }
        }
    

The form is posted to above action method on submit. In the above method, we have accepted model object as parameter which triggers the model binding and result of model binding is ModelState. When the ModelState is invalid, the model object is returned with the View.

Till now we have seen how to implement the validation Server side. Lets see how to do it client side.

In order to make it work client side we need to make sure following below points.

1. Make sure below two keys are set to true in web.config.


Make sure the keys ClientValidationEnabled and UnobtrusiveJavaScriptEnabled are set to true in the Web.config file.

2. Do not forget to refer below javascript files in your View or in Layout if View refers Layout.


Once you made sure you followed above two points, the validation will happen on client side on form submission. If the form validation is success then form is posted to the server else error message is shown to user.


Remote Validation when JavaScript is disabled on browser.

  • In this article we are going to see what to do when JavaScript is disabled on client browser and Remote attribute does not validate the logic.
  • To understand this article better read Remote Validation article first, we have used same UserName validation scenario in this article.
Remote Validation

What’s wrong when JavaScript is disabled?
When JavaScript is disabled in the browser, the <script> tags won't be interpreted and executed in your document, including all your jQuery and AJAX JS code.

Why JavaScript disabled?
It depends on user to user whether they want JavaScript enable on browser or not. Following are the most common reason to disable JavaScript on browser.

Speed & Bandwidth
Usability & Accessibility
Platform Support
Security

Why Server side logic?
The server side logic is necessary as client side logic does not work due to any reason it is always safe and good to have server side logic.


Controller:
 
[HttpPost]
        public ActionResult Index(UserViewModel model)
        {
            RemoteValidationService service = new RemoteValidationService();
            if (service.IsValidUserName(model.UserName))
            {
                ModelState.AddModelError("UserName", "Username already exist");
                return View(model);
            }
            service.SaveUser(model);
            return View();
        }
    
The form is posted to the above Action method. In this method we are checking if username is present in database or not. If username is present in database then we are adding an error to ModelState making it invalid and returning the View with model having model error. So, this will show error message against the UserName control.

Screenshot:


So it is good practice to have server side validation as backup to client side validation. This is how you can cover up the validation performed by Remote attribute by writing server side logic as well.

Remote Validation attribute in Asp.net MVC Razor

The article explains how to perform remote validation and mandatory settings required for remote validation.
As an example we are remotely validating username property of user with database. We are considering the username scenario in this article. We are going to validate whether the username entered by the user exist in database or not.

First Let us see What is Remote Validation ?
Demo


  • Remote validation allows the application to call the controller actions using client side script.
  • This is extremely useful when you want to perform a back end query without having to perform a full server postback.
  • Remote Validation is basically an ajax call to an action method which queries the database to validate username in our case and returns true or false based on validation result.
  • The process of Remote Validation does not involve postback.


ViewModel:
using System;
using System.Collections.Generic;
using System.Linq;
using System.Web;
using System.ComponentModel.DataAnnotations;
using System.Web.Mvc;

namespace RemoteValidationMVCRazor.ViewModel
{
    public class UserViewModel
    {
        public string Name { get; set; }

        [Remote("IsValidUserName", "Home", ErrorMessage = "Username Exist !")]
        public string UserName { get; set; }

        [DataType(DataType.Password)]
        public string Password { get; set; }
    }
}
    

The above class is our simple ViewModel having three properties. We have applied Remote attribute on UserName property. We need to refer System.Web.Mvc namespace to use Remote attribute.
                                 The first parameter supplied is the Action method name i.e. IsValidUserName which will be called remotely. The second parameter supplied is the name of the controller Home in our case. The third parameter is the error message, this message will be shown if the validation fails.

This ViewModel we are going to use on our View as below:

View:
@model RemoteValidationMVCRazor.ViewModel.UserViewModel
@{
    ViewBag.Title = "Index";
    Layout = "~/Views/Shared/_Layout.cshtml";
}

<h2>Index</h2>


@using (Html.BeginForm())
{
    @Html.EditorForModel("UserViewModel")

    <br /><br />
    <input type="submit" value="Submit" />
}
    

In the above View, we have referred UserViewModel as model of the View. We have used EditorForModel helper to render controls for the property of the ViewModel. We have also created a submit button.

Controller:
using System;
using System.Collections.Generic;
using System.Linq;
using System.Web;
using System.Web.Mvc;
using RemoteValidationMVCRazor.Service;
using RemoteValidationMVCRazor.ViewModel;

namespace RemoteValidationMVCRazor.Controllers
{
    public class HomeController : Controller
    {
        //
        // GET: /Home/

        public ActionResult Index()
        {
            return View();
        }

        public JsonResult IsValidUserName(string UserName)
        {
            RemoteValidationService service = new RemoteValidationService();
            return Json(service.IsValidUserName(UserName), JsonRequestBehavior.AllowGet);
        }

        [HttpPost]
        public ActionResult Index(UserViewModel model)
        {
            RemoteValidationService service = new RemoteValidationService();
            service.SaveUser(model);
            return View();
        }

    }
}
    
We have a simple Controller named HomeController. We have three method inside the controller.
The first ActionResult method is used to render the Index view. The second JsonResult method is the method which will be called remotely to validate username. The third ActionResult method is the method where form is posted i.e. Index with HttpPost attribute. The parameter name UserName in the IsValidUserName method should match the property name in the ViewModel, otherwise the parameter value will be null.


Service Class:
using System;
using System.Collections.Generic;
using System.Linq;
using System.Web;
using RemoteValidationMVCRazor.Models;
using RemoteValidationMVCRazor.ViewModel;

namespace RemoteValidationMVCRazor.Service
{
    public class RemoteValidationService
    {
        public bool IsValidUserName(string username)
        {
            using (RemoteValidationEntities dbContext = new RemoteValidationEntities())
            {
                return !dbContext.Users.Any(user => user.Username == username);
            }
        }

        public void SaveUser(UserViewModel model)
        {
            Users user = new Users();
            user.Name = model.Name;
            user.Username = model.UserName;
            user.Password = model.Password;
            using (RemoteValidationEntities dbContext = new RemoteValidationEntities())
            {
                dbContext.Users.AddObject(user);
                dbContext.SaveChanges();
            }
        }
    }
}
    
The service class has methods which interacts with the database. The first method is IsValidUserName which validates whether DB has user with same username. The Any Linq function returns a boolean value true if DB has username and Vice Versa, and we return negation of that boolean value. That means if user is present we return false as jSon result concluding validation failure, and if user is not present we return true concluding validation success.

Layout:
<!DOCTYPE html>
<html>
<head>
    <meta charset="utf-8" />
    <title>@ViewBag.Title</title>
    <link href="@Url.Content("~/Content/Site.css")" rel="stylesheet" type="text/css" />
    <script src="@Url.Content("~/Scripts/jquery-1.5.1.min.js")" type="text/javascript"></script>
    <script src="@Url.Content("~/Scripts/jquery.validate.min.js")" type="text/javascript"></script>
    <script src="@Url.Content("~/Scripts/jquery.validate.unobtrusive.min.js")" type="text/javascript"></script>
</head>

<body>
    @RenderBody()
</body>
</html>
    
The layout must contains above three script files. These file are must, without these files remote validation is not possible. As we have referred this Layout on our View, we don't need to specify these scripts on View.

Web Config:


We need to have above keys set to true in web.config. If either of these keys are absent or set to false remote validation will not work.

How attribute works:
When the user enters some text in the control i.e. UserName in our case and clicks outside the onblur event is triggered on which IsValidUserName method is called, based on the validation if the user is not present in the database the validation message is shown on UI. Once the onblur event is triggered on making further changes in the same control, the IsValidUserName method is called as soon as you make change to the existing username entered i.e. (onkeyPress).
                            When the onblur event is triggered for the first time and ajax request is made to the IsValidUserName Method. The screenshot below shows the ajax call details. On subsequent changes to username the ajax request is made on keypress.


The ajax call details you can get under Network tab of develper tool.

Points to Remember:


  • Remote Validation is use to validate user input against database without full postback using ajax call.
  • The remotely method called should return boolean value as JsonResult.
  • The three script files must be referred on View or on Layout file i.e. jquery-1.5.1.min.js or higher version, jquery.validate.min.js, and jquery.validate.unobtrusive.min.js.
  • The web.config must contains keys ClientValidationEnabled and UnobtrusiveJavaScriptEnabled set to true under appSettings.
  • The Remote Validation will not work if the Javascript is disabled on the browser.

Also read article at below link which demonstrates how to cover up Remote validation when JavaScript is disabled on browser. 

Editor Templates Example in ASP.NET MVC

Editor Templates Example in ASP.NET  MVC
  • We commonly use HTML helpers and model binding while working with MVC Razor.
  • MVC framework smartly renders HTML for different type of data like textbox for string or int and checkbox for bool proeprty, when EditorFor or EditorForModel helper is used to render the control.
  • We often have requirement where we want something more like rendering dropdown for model's property of type enum.
  • This is where editor template comes to rescue the situation.
  • In this example, we will render a dropdown control for enum type model property.
ViewModel:
        using System;
        using System.Collections.Generic;
        using System.Linq;
        using System.Web;
        using System.ComponentModel.DataAnnotations;

        namespace BindingDropdownToEnum.Models
        {
            public class DropdownModel
            {
                [UIHint("DropDownList")]
                public players playerList { get; set; }
            }

            public enum players
            {
                Fabregas = 1,
                Rocisky = 2,
                Ozil = 3,
                Cazorla = 4
            }
        }
    

In the above view model we have created an enum named players. We have created one  class which has one poperty of type players (i.e. enum). We have used DataAnnotation attribute UIHint to indicate MVC framework the editor template to pick while rendering control for the property. In the above example, we are asking MVC framework to use DropDownList cshtml file under Editor Template folder.

View:
    @model BindingDropdownToEnum.Models.DropdownModel

    @{
        ViewBag.Title = "DropdownBinding";
    }

    <h2>DropdownBinding</h2>

    @Html.EditorForModel()

We have used EditorForModel to render controls for model properties.

EditorTemplate:

    @using BindingDropdownToEnum.Models

    @Html.DropDownList("playerList", Enum.GetValues(typeof(players)).Cast<players>().Select(c => new SelectListItem { Text = c.ToString(), Value = c.ToString() }))

In the above EditorTemplate we have rendered a dropdownlist control using the enum. When the view is rendered, the UIHint attribute indicates MVC framework to use EditorTemplate to render the control.
                                       The editor templates are created under EditorTemplates folder which is under Shared folder. Thus using EditorTemplates we can render any control for any type of property using EditorForModel or EditorFor HTML helper.

Screenshots:


The above textbox is rendered when UIHint attribute is not used. The below screenshot shows the result with using UIHint attribute.


Conclusion:


  • Thus the editor templates can be used with EditorFor or EditorForModel helpers.
  • The editor templates can be used to render any type of control for model property.

Upload multiple files to database using ASP.NET MVC

Upload multiple files to database using ASP.NET MVC
  • In this article we will see how to upload multiple files to database. 
  • The main trick is to select multiple files and post it to the controller's action method.
  • The saving code will be same, but will iterate for each file.
Demo

Database:


We have a simple table named UploadedFiles. We have three columns in the table:


  • FileId - This is primary key identity column.
  • ContentType - This column stores the file type.
  • ImageBytes - This column is of type varbinary and stores file bytes.

ViewModel:

       using System;
        using System.Collections.Generic;
        using System.Linq;
        using System.Web;

        namespace FileUpload.ViewModel
        {
            public class FileUploadViewModel
            {
                public IEnumerable<HttpPostedFileBase> File { get; set; }
            }
        }
    
We have created a IEnumerable property of type HttpPostedFileBase to support multiple uploads. The HttpPostedFileBase type property contains file stream and file information when posted to the controller action.

View:


    @model FileUpload.ViewModel.FileUploadViewModel

@{
    ViewBag.Title = "FileUpload";
}

<h2>FileUpload</h2>


    <div>
        @using (Html.BeginForm("UploadMultipleFiles", "FileUpload", FormMethod.Post, new { @enctype = "multipart/form-data" }))
        {
            @Html.TextBoxFor(c => c.File, new { type = "file", multiple = "true" })
            <input type="submit" style="margin-left:40px;cursor:pointer;" id="upload" value="Upload"/>
        }
    </div>

We have referred the above View model in the view. We have used TextBoxFor helper to render file control using model binding. We have used htmlAttribute object to set multiple property of control to true which allows to select multiple files.
            We have created a form using BeginForm helper. We have also created a submit button. When form is submitted the files are posted to UploadMultipleFiles action method of FileUpload controller

Controller:

       [HttpPost]
        public ActionResult UploadMultipleFiles(FileUploadViewModel fileModel)
        {
            FileUploadService service = new FileUploadService();
            foreach (var item in fileModel.File)
            {
                service.SaveFileDetails(item);
            }
            return View("FileUpload");
        }
    
We have accepted the object of our View model as a parameter. This object has the posted files. The File property of the FileUploadViewModel class is iterated for multiple files and each file is saved to database using SaveFileDetails method.

Service:
       public class FileUploadService
    {
        public void SaveFileDetails(HttpPostedFileBase file)
        {
            UploadedFiles newFile = new UploadedFiles();
            newFile.ContentType = file.ContentType;
            newFile.ImageBytes = ConvertToBytes(file);
            using (FileUploadEntities dataContext = new FileUploadEntities())
            {
                dataContext.UploadedFiles.AddObject(newFile);
                dataContext.SaveChanges();
            }
        }

        public byte[] ConvertToBytes(HttpPostedFileBase file)
        {
            byte[] imageBytes = null;
            BinaryReader reader = new BinaryReader(file.InputStream);
            imageBytes = reader.ReadBytes((int)file.ContentLength);
            return imageBytes;
        }
    }
    
The SaveFileDetails saves the file data to the database. The ConvertToBytes method converts the stream to file bytes.

Conclusion:


  • We need to set the multiple attribute to true of the file control.
  • The view model's property should of type IEnumerable.
  • Iterate on the posted files and save it to the database.


Screenshots:


Ways to call Stored procedure using Entity Framework in ASP.NET MVC3 Razor

Ways to call Stored procedure using Entity Framework in ASP.NET  MVC3 Razor
  • In this article we are concentrating on two ways by which we can call stored procedure using entity framework.
  • Entity Framework performs below expectation when fetching large data, so often we use stored procedure to fetch data.
  • In the application where one has used entity framework, one can use entity framework itself to call stored procedure.

Demo

Lets see what are these two ways:

Way 1:
This is probably the simplest method to call a stored procedure with minimal effort.
We have created a simple stored procedure which fetches the registered user to the application. The stored procedure looks like below:
In the above image above is the stored procedure and below is the result that stored procedure returns.

        using (SampleAPPEntities dataContext = new SampleAPPEntities())
            {
                List<Register> userList = dataContext.ExecuteStoreQuery<Register>("RegisteredUsers").ToList();
            }
    

In the above code, we have created a data context object. We have used ExecuteStoreQuery method of data context to fetch the data. The method accepts a parameter which is the name of the stored procedure to call. We are retuning list of type Register class which maps to the Register table in database whose data we are retreiving using stored procedure.


Way 2:
In this method, we first add stored procedure to the .edmx file. The function inport for the stored procedure is created, function import creates a function which uses the stored procedure.

Step 1: Adding stored procedure to EF
Open the edmx file, right click on it, a dialog box will appear as shown below:


Click on Update Model from Database option which will open another dialog box as shown below:

Select the stored procedure and click the Finish button. This will add the stored procedure to the solution or to the edmx file.


In the above image you could see RegisteredUsers added under Stored Procedures folder.

Step 2:
In this step we will see how to add funtion import for the stored procedure.
Right click on the stored procedure added, this will open a window as shown below:
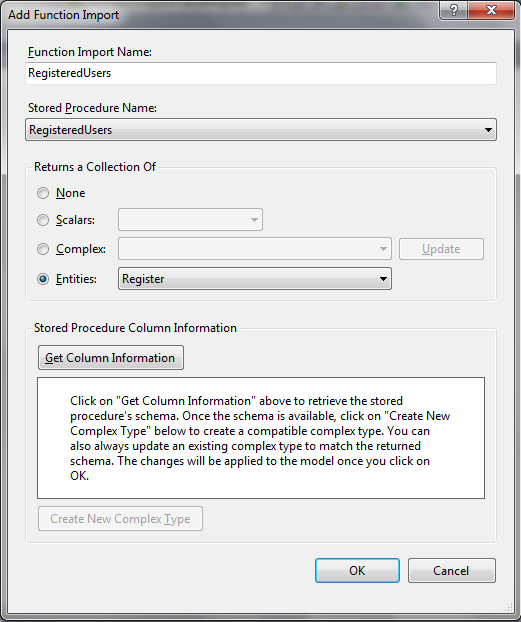
click on the Add Function Import option, this will open another window as shown below:

The function import name field is pre populated, you can give the function name you want, the stored procedure dropdown has the stored procedure for which you want to add function import.
Select the Entities radio button and select the entity to which you want to map the stored procedure. The stored procedure will return the result of the selected entity type. On clicking ok the funtion import will be created for stored procedure.

        using (SampleAPPEntities dataContext = new SampleAPPEntities())
            {
                List<Register> userList1 = dataContext.GetRegisteredUsers().ToList();
            }
    
We can use the funtion import created to call the stored procedure to get the data from Database.
So, these are the two ways by which the stored procedure can be called using entity framework.

HTML 5 Local Storage best practices with demo

  • The Local storage in HTML5 is used to store data on client side.
  • The Local storage stores the saved data on a user's computer even after closing the browser window.
  • We need to be careful while using Local storage, as it could slow down your site.
  • In this article we will see how not to use Local storage.
Following points we need to consider while using local storage
  • Do not serialize unnecessarily
  • Do not use excessive keys
  • Do not use excessive gets/sets
  • Do not block the UI
  • Do not assume local storage will always work
  • Do not use key names that collide

Do not serialize unnecessarily

Before
        function store(key, val) {
            localStorage.setItem(key, JSON.stringify(val));
        }
            store('num', 1);
            store('on', true);
            store('name', 'HTML5');
    
After
        function store(key, val) {
          localStorage.setItem(key, val);
        }
        store('num', '1');
        store('on', 'true');
        store('name', 'HTML5');
    

Use the string where possible avoiding serializing most of the time.

Do not use excessive keys

Before
        localStorage.setItem('first', 'HTML5');
        localStorage.setItem('middle', 'Storage');
        localStorage.setItem('last', 'Local Storage');
    

After
        localStorage.setItem('name', 'Local Storage');
    

Always avoid creating multiple keys when you can have single for multiple data.

Do not use excessive gets/sets

Before
        $('input[type="checkbox"]').click(function() {
          localStorage.setItem($(this).attr('name'), $(this).is(':checked'));
        });
    

After
        window.onunload = function() {
          $('input[type="checkbox"]').each(function() {
            localStorage.setItem($(this).attr('name'), $(this).is(':checked'));
          });
        };
    
Do cache data in local memory or the DOM, and only get/set on window load/unload.

Do not block the UI

Before
        <head>
        <script>
            $('#name').html(localStorage.getItem('name'));
        </script>
        </head>
    
After
        <html>
        <body></body>
        <script>
            window.onload = function () {
                $('#name').html(localStorage.getItem('name'));
            };
        </script>
        </html>
    

Do defer or avoid using localStorage until onload.

Before

        $('button').click(function() {
          var name = localStorage.getItem('name');
          $('#name').html(name);
        });
    

After
        $('button').click(function() {
          window.setTimeout(function() {
            var name = localStorage.getItem('name');
            $('#name').html(name);
          }, 10);
        });
    

Do use setTimeout to defer localStorage access.

Before

        $('textarea').keydown(function() {
          localStorage.setItem('text', $(this).text());
        });
    

After
        $('textarea').keydown(function() {
          $.debounce(250, function() {
            localStorage.setItem('text', $(this).text());
          });
        });
    

Do not assume local storage will always work
Bad
        localStorage.setItem('Hello', 'World');
    

Better
        if (window.localStorage) {
          localStorage.setItem('Hello', 'World');
        }
    

Best
        if (window.localStorage) {
          try {
            localStorage.setItem('Hello', 'World');
          } catch(e) {
            if (e.name === 'QUOTA_EXCEEDED_ERR' || e.name === 'NS_ERROR_DOM_QUOTA_REACHED') {
            } else {
            }
          }
        }
    

Do check for feature support, writeable, and quota.

Do not use keys that collide

Before
        localStorage.setItem('name', 'HTML5');
    
After
        localStorage.setItem('first-name', 'HTML5');
    
Do use highly descriptive keys and avoid using keys that collide.

Database Storage in HTML5 with demo

  • HTML5 provides database storage to store data on client's machine using a Structured Query Language (SQL) database.
  • It uses a temporary database to store data for a specified period of time.
  • In order to use this feature we need to open database connection, then we can execute SQL queries on database using two basic functions i.e. transaction() and executeSql().
Opening an connection

        var db = openDatabase('HTML5DB', '1.0', 'Client Side DB', 50 * 1024 * 1024);

        //With Callback Function
        var db = openDatabase('HTML5DB', '1.0', 'Client Side DB', 50 * 1024 * 1024, function () {
                alert("DB Created");
            });
    
The preceding code snippet creates a database object, db, with the title HTML5DB, a version number of 1.0, along with a description and approximate size and callback function in later one.

We need to pass basic four arguments to the openDatabase method and callback function if needed.


  • Database name
  • Version number
  • Text Description
  • Size (Approx)
  • Callback 

The callback function is called when the database is being created. The return value from the openDatabase method contains the transaction methods needed to perform SQL operations (queries) on database.
If you try to open a database that doesn’t exist, the API will create it on the fly for you. You also don’t have to worry about closing databases.

Size

The default database size is 5MB for borwsers. The Safari browser shows prompt if user tries to create database exceeding the default database size.


Version
The version number is required argument to openDatabase. 
You can change or update version of database using changeVersion method.
Using this method we can know which version of database user is using and then we can upgrade. The changeVersion method is supported only in chrome and opera.


Transaction
In very simple words Transaction is a single unit of work. If a transaction is successful, all of the data modifications made during the transaction are committed and become a permanent part of the database. If a transaction encounters errors and must be canceled or rolled back, then all of the data modifications are erased.
  The ability to rollback if some error occurs is why we use transaction for executing sql queries. There are also error ans success callbacks on the transaction, so you can manage errors.
    //A simple transaction
        db.transaction(function (tx) {
        //using tx object we can execute multiple sql queries.
                tx.executeSql("CREATE TABLE IF NOT EXISTS EMPLOYEE (id unique,name Text)");
            });
    
In the preceding code snippet we have used transaction and used executeSql method inside transaction. The above SQL query creates a table EMPLOYEE.

executeSql method

The executeSql method is used to execute a SQL query on database.
The executeSql method takes four arguments:

1. a string query.

2. an array of strings to insert the values for place holders in string query.
3. success callback function.
4. failure calback function.

Its a good practice to use SQL quesries or executeSql method inside transaction.


Query to Create Table

    $("#CreateTable").click(function () {
            db.transaction(function (tx) {
                tx.executeSql("CREATE TABLE IF NOT EXISTS EMPLOYEE (id unique,name Text)", [], function () {
                    alert("Table Created");
                }, function () {
                    alert("Error");
                });
            });
        });
    

The preceding code snippet creates a table EMPLOYEE with id and name as parameter. We have also defined callback functions for success and failure of executeSql method.

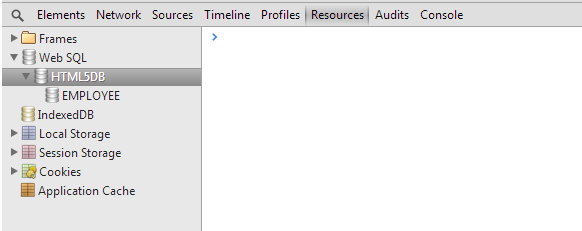
You can check chrome's developer tool to verify the Database and Table creation. You can verify this under Resources tab.


We have created EMPLOYEE table under HTML5DB database. We can verify the table created under Web SQL.

Insert Record

$("#InsertRecord").click(function () {
            db.transaction(function (tx) {
                tx.executeSql("INSERT INTO EMPLOYEE (id,name) VALUES (1,'Jack Wilshere')", [], function () {
                    alert("Record Inserted");
                }, function () {
                    alert("Error");
                });
            });
        });
    
The preceding code snippet inserts a record in the EMPLOYEE table.

Suppose we want to capture the table data to insert from external source, then we can use the second parameter i.e. inserting the values in the table supplying values to the placeholder defined in the query.

        var id = "2";
        var name = "Thierry Henry";

        $("#InsertRecord").click(function () {
            db.transaction(function (tx) {
                tx.executeSql("INSERT INTO EMPLOYEE (id,name) VALUES (?,?)", [id, name], function () {
                    alert("Record Inserted");
                }, function () {
                    alert("Error");
                });
            });
        });
    
In the preceding code snippet we have defined placeholders in the query. We are then passing values to the placeholder to insert data into the table. The executeSql method's second argument maps the field data to the query.
   id and name are external variables, and executeSql maps each item in the array argument to the “?”s.

Display Records

        $("#SelectRecord").click(function () {
            db.transaction(function (tx) {
                tx.executeSql('SELECT * FROM EMPLOYEE', [], function (tx, results) {
                    var len = results.rows.length, i;
                    var ulEle = $("<ul/>");
                    for (i = 0; i < len; i++) {
                        ulEle.append("<li>" + results.rows.item(i).name + "</li>");
                    }
                    $("#targetDiv").append(ulEle);
                });
            });
        });
    
In the preceding code snippet we have used select query to select all the records from the table and displayed on UI. We have created a UL element and then appened LI elements to UL element.

We need to use the column name after the item object to access the value of that column.


For Example

In order to get name column's value we should use it like below:
results.rows.item(i).name


Deleting a Record
        $("#DeleteRecord").click(function () {
            db.transaction(function (tx) {
                tx.executeSql("DELETE FROM EMPLOYEE WHERE id=1", [], function () {
                    alert("Record Deleted");
                }, function () {
                    alert("Error");
                });
            });
        });
    
In the above code snippet we have used Delete statement to delete record with id =1 from EMPLOYEE table.

Dropping a Table

        $("#DropTable").click(function () {
            db.transaction(function (tx) {
                tx.executeSql("DROP TABLE EMPLOYEE", [], function () {
                    alert("Table Deleted");
                }, function () {
                    alert("Error");
                });
            });
        });
    
In the preceding code snippet we have delete EMPLOYEE table from the HTML5DB database.

This is all about Database storage in HTML5, enough to start on Database storage.