Local Storage in HTML5 with demo

  • The local storage is same as session storage, except the feature of persistency.
  • Local storage can be said as persistent version of sessionStorage object.
  • The sessionStorage stores the data till the duration of a browser tab session, while the local storage stores the saved data on a user's computer even after closing the browser window.
Demo

Comparing with cookies

Cookies indeed can be used for persistent local storage of small amounts of data. They have following downsides:

  • Cookies are included with every HTTP request, thereby slowing down the web application by needlessly transmitting the same data again and again.
  • Cookies are included with every HTTP request, thereby sending data unencrypted over the internet (unless your application is served over SSL). 
  • Cookies are limited to about 4KB of data, not enough to use for large data.

What Local storage provides

  • A lot of storage space on client.
  • The data stored persist beyond a page refresh.
  • The data stored using local  storage is not transmitted to the server.

Storage API

Demo

  • getItem(key) - Returns a value on the basis of a specified key from the DOM storage area. If the key does not exist null is returned.
  • setItem(key,value) - Stores a string value along with a specified key inside the DOM storage area.
  • removeItem(key) - Removes a value on the basis of a specified key inside the DOM storage area.
  • key(index) - Returns the key of a value at the specified index.
  • clear() - Clears all data from the DOM storage area.

Below is the example for each storage API:

        localStorage.setItem("Name", "Thierry Henry");        // Store an string with the name "Name"
        localStorage.getItem("Name");           // Retrieve a value
 
        // Enumerate all stored name/value pairs
        for(var i = 0; i < localStorage.length; i++) {  // Length gives the # of pairs
            var name = localStorage.key(i);             // Get the name of pair i
            var value = localStorage.getItem(name);     // Get the value of that pair
        }
 
        localStorage.removeItem("Name");        // Delete the item "Name"
 
        localStorage.clear();                // Delete all keys from storage
 
        var count = localStorage.length;     // Gets the count of key-value pairs present in localStorage
    
Storage Events

Whenever the data stored in localStorage or sessionStorage changes, the browser triggers a storage event on any other Window objects to which that data is visible (but not on the window that made the change). If a browser has two tabs open to pages with the same origin, and one of those pages stores a value in localStorage, the other tab will receive a storage event. Remember that localStorage is scoped to the top-level window, so storage events are only triggered for localStorage changes when there are frames involved. Also note that storage events are only triggered when storage actually changes. Setting an existing stored item to its current value does not trigger an event, nor does removing an item that does not exist in storage.


Register a handler for storage events with addEventListener() (or attachEvent() in IE). In most browsers, you can also set the onstorage property of the Window object, but at the time of this writing, Firefox does not support that property.


The event object associated with a storage event has five important properties (they are not supported by IE8, unfortunately):


  • key The name or key of the item that was set or removed. If the clear() method was called, this property will be null.
  • newValue Holds the new value of the item, or null if removeItem() was called.
  • oldValue Holds the old value of an existing item that changed or was deleted, or null if a new item was inserted.
  • storageArea This property will equal either the localStorage or the sessionStorage property of the target Window object.
  • url The URL (as a string) of the document whose script made this storage change.


Avoid below with Local Storage

The local storage access is synchronous.The operations like JSON.parse or JSPN.stringify takes time which could slow donw your site.


  • Avoid serializing unnecessarily .
  • Do not use excessive keys.
  • Do not use excessive gets and sets.
  • Do not block the UI.
Local storage best practices

Session Storage in HTML5 with Demo

  • The sessionstorage object exists as a property of window object in supporting browsers. The sessionStorage object stores data that can persist for as long as window or tab is open.Even if you navigate away from page that stores the data and come back, the data saved to sessionStorage is still live.
  • The sessionStorage is scoped to the document origin. The document origin is defined by its protocol, hostname, and port. The data stored in sessionStorage is tied to protocol, hostname, and port of the page that saved the information and only the same pages sharing the same protocol, hostname, and port can access the data later.
  • The following urls has a different origins:
         http://www.sessionStorage.com        // Protocol: http;                                                                                      //hostname:www.example.com
         https://www.sessionStorage.com       // Different protocol
         http://static.sessionStorage.com     // Different hostname
         http://www.sessionStorage.com:8000   // Different port
  • All document with same origin shares the same local storage data. They can read and ovewrite each other's data. But the documents with different origins can never read or overwrite each other's data.
  • The sessionStorage is unique to a particluar window or tab. For example, suppose you open gmail in two different tabs of browser and application saves data in the sessionstorage. The data from the first tab is not accessible to other tab, even though the protocol, hostname, and port are exactly the same. Note that the sessionStorage is also scoped by browser vendor. If you visit a site using chrome and the visit the same using Firefox, then any data stored during first visit will not be accessible during the second visit.   
  • The window based scoping of sessionStorage is only for top-level windows. If one browser tab contains two iframe element, and those iframe holds two document with same origin, then those two framed documents will share the session storage.
  • The data stored in sessionStorage is deleted once the window or tab is closed, or if user request browser to do so. Such behaviour, with data tying to particular window or tab combined, ensures that the data does not get exposed or stored indefinitely.
  • The data stored to sessionStorage is saved in key-value pairs where both the key and value are strings.

Demo

Storage API

Demo

  • getItem(key) - Returns a value on the basis of a specified key from the DOM storage area. If the key does not exist null is returned.
  • setItem(key,value) - Stores a string value along with a specified key inside the DOM storage area.
  • removeItem(key) - Removes a value on the basis of a specified key inside the DOM storage area.
  • key(index) - Returns the key of a value at the specified index.
  • clear() - Clears all data from the DOM storage area.

There is one more property named length, which indicates how many key-value pairs are currently stored in sessionStorage.

        sessionStorage.setItem("Name", "Thierry Henry");        // Store an string with the name "Name"
        sessionStorage.getItem("Name");           // Retrieve a value

        // Enumerate all stored name/value pairs
        for(var i = 0; i < sessionStorage.length; i++) {  // Length gives the # of pairs
            var name = sessionStorage.key(i);             // Get the name of pair i
            var value = sessionStorage.getItem(name);     // Get the value of that pair
        }

        sessionStorage.removeItem("Name");        // Delete the item "Name"
        
        sessionStorage.clear();                // Delete all keys from storage
        
        var count = sessionStorage.length;     // Gets the count of key-value pairs present in sessionStorage
    

Storage Events

Whenever the data stored in localStorage or sessionStorage changes, the browser triggers a storage event on any other Window objects to which that data is visible (but not on the window that made the change). If a browser has two tabs open to pages with the same origin, and one of those pages stores a value in localStorage, the other tab will receive a storage event. Remember that sessionStorage is scoped to the top-level window, so storage events are only triggered for sessionStorage changes when there are frames involved. Also note that storage events are only triggered when storage actually changes. Setting an existing stored item to its current value does not trigger an event, nor does removing an item that does not exist in storage.


Register a handler for storage events with addEventListener() (or attachEvent() in IE). In most browsers, you can also set the onstorage property of the Window object, but at the time of this writing, Firefox does not support that property.


The event object associated with a storage event has five important properties (they are not supported by IE8, unfortunately):


  • key - The name or key of the item that was set or removed. If the clear() method was called, this property will be null.
  • newValue - Holds the new value of the item, or null if removeItem() was called.
  • oldValue - Holds the old value of an existing item that changed or was deleted, or null if a new item was inserted.
  • storageArea - This property will equal either the localStorage or the sessionStorage property of the target Window object.
  • url - The URL (as a string) of the document whose script made this storage change.

Browser Support
  • Firefox 3 returns an object when reading a value from sessionStorage. The object has a property named value that contains the actual string value that was stored. Firefox 3.5 correctly returns a string when retrieving values.
  • Firefox 3 doesn’t implement the clear() method; Firefox 3.5 does.
  • Internet Explorer 8 doesn’t allow you to remove a key by using the delete operator.
  • Firefox 3.5 is the only browser that maintains sessionStorage data when the browser crashes and makes it available when the browser is restarted after a crash.
  • Internet Explorer 8 saves data to s asynchronously while the others do so synchronously. To force IE to write immediately, call the proprietary begin() method, then make your changes, then call the proprietary commit() method.
  • Firefox’s and Safari’s storage limit is 5MB per domain, Internet Explorer’s limit is 10 MB per domain.
  • Internet Explorer 8 only supports the url property of the event object.
  • Firefox 3 and 3.5 throw errors when you try to access sessionStorage if cookies area disabled on the browser.


Bind Checkboxlist to xml file in asp.net

How to bind asp.net checkboxlist to xml file using dataset

This asp.net C# example is about checkboxlist binding to xml file using dataset
Now we create an xml file. We have named the xml file as states.xml. This xml file contains some states name from india. This  states will be populated to dropdownlist using asp.net c#
To create xml file open website menu ,select add new item, select xml file name it as states.xml,save it in root folder.After creating the xml file add below markup to states.xml


In the .aspx page add the checkboxlist control. In the designer page we have named the checkboxlist control as cblStatesThe name of the state will be assigned to text part and id will be assigned to value part of asp.net check box list control

Complete Aspx Code

<html xmlns="http://www.w3.org/1999/xhtml">
<head runat="server">
    <title></title>
</head>
<body>
    <form id="form1" runat="server">

     <asp:CheckBoxList ID="cblStates" runat="server">
     </asp:CheckBoxList>
  
    </form>
</body>
</html>


To bind the dropdownlist to xml file we have created a method in page load method and named it as BindXmlToCheckBoxList().

Complete c# code

using System;
using System.Collections.Generic;
using System.Linq;
using System.Web;
using System.Web.UI;
using System.Web.UI.WebControls;
using System.Data;

namespace XMLExamples
{
    public partial class CheckBoxListExample : System.Web.UI.Page
    {
        protected void Page_Load(object sender, EventArgs e)
        {
            if (!IsPostBack)
            {
                BindXmlToCheckBoxList();
            }
        }

        private void BindXmlToCheckBoxList()
        {
            string filePath = Server.MapPath("~/States.xml");
            using (DataSet ds = new DataSet())
            {
                ds.ReadXml(filePath);

                cblStates.DataSource = ds;
                cblStates.DataTextField = "name";
                cblStates.DataValueField = "id";
                cblStates.DataBind();
                
            }
        }
    }
}

Exploring Client-Side Storage in HTML5

Exploring Client-Side Storage in HTML5
  • Often you need to store data accessed from the internet to your local system. 
  • The most common method to store data locally in all browsers is cookies, which are key-value pairs of strings that are stored locally in a text file. 
  • These text files are sent to the server, having the same domain name, with respect to every HTTP request.
  • There was an increasing number of issues with cookies, however, especially as Web developers tried to use them in ways the creators didn't originally envision.
  • Cookies pose multiple security issues. They are unencrypted, so unless your entire website is delivered over SSL, the cookies aren't secure. Across the time some hackers discovered, cookies can also be stolen via cross-site scripting techniques and DNS spoofing. 
  • When users found out about the security and privacy issues with cookies, many users started to restrict or entirely disable cookies — meaning that websites could not always assume they could use cookies.
  • Cookies also pose performance issues. As cookies are included in every HTTP request, they can affect how long it takes for a browser to download a webpage — which means you don't want to store large amounts of data in them. And even if you wanted to store lots of data, you usually couldn't. Most browsers restricted each cookie to a max size of 4KB and allowed a max of 20 cookies per domain — not a lot of space.
  • Luckily, we are now in the era of "HTML5": the new set of HTML, CSS, and JavaScript specifications that try to make Web development easier and websites more powerful. These specifications include multiple approaches to client-side storage that go far beyond cookies
  • The HTML5 provides a new feature that supports the client-side storage, which is further divided into the following types of storage:


Session Storage
Session storage is a storage that acts as cookies but has more storage capacity. A cookie has the capacity to store a maximum of 4 kilo bytes (KB) data; however, a session storage has the capacity to store data in mega bytes (MB).

Learn more about session storage


Local Storage

Local storage is same as the session storage, except the feature of persistency. In other words, a localStorage object can be assumed as a persistent version of a sessionStorage object. The session storage stores the data till the duration of a browser tab session, while the local storage stores the saved data on a user's computer even after closing the browser window.

Learn more about local storage


Database Storage

HTML5 also provides database storage to store data on a client's machine using a Structured Query language (SQL) database. It uses a temporary database to store data for a specified period of time.
      The following code snippet shows how to make a connection with a database:


db = openDatabase("DBTest", "1.0", "HTML5 Database API example", 200000);

The preceding code snippet creates a database object, db, with the title DBTest, a version number of 1.0, along with a description and approximate size.
         After creating a database connection, two basic functions transaction() and executeSql() are used to execute a SQL query. The transaction() function takes a single argument, executeSql() function, which actually executes the query. The executeSql() function takes four arguments, a string query, an array of strings to insert the values for place holders in string query, a function on successful execution of the query, and a function on failure of the query.

Learn more about Database Storage


IndexedDB

The IndexedDB is an object based data store.
The IndexedDB API is a more capable but far more complex API. The API allows you to store large amounts of structured data (in the form of objects and object stores) and then perform queries on that data using indexe
The API permits you to create databases, data stores and indexes, handle revisions, populate data using transactions, run non-blocking queries, and traverse data sets using cursors. 

The File API

The File API is a way for websites to store files on the user's file system, scoped to their own little sandbox. The File API is very similar to the IndexedDB in actual capabilities — synchronous data storage and retrieval — but its API may feel more intuitive for developers that are accustomed to dealing with the file system. In addition, the File API specification includes support for storing binary files, such as images or PDFs.

Reason to store data client-side


  • Performace is enhanced when you are not going to server for data which can be stored client side. The data can be cached client-side, so it can be retrieved without additional server requests.
  • When you have significant amount of client-side data to store like HTML string or configuration settings.
  • When you want to make your application work offline. No connection or request to server.
  • Remembers user data, form input and also retain application state.

Data Security with Client-Side Storage

We must also discuss security when we discuss data storage and anything related to data. Like storing information in a server database of a web application, similar security guidelines should be applied to database storage on the client side. This is especially true since unlike a server where you may have control over the firewalls, users, passwords, and other security features, a visitor's browser is outside the immediate network. This makes it that much more important to be vigilant about what is stored in the client browser and how it is stored.


Storage Data Type


Cookies and localStorage accept only strings, but of course, you can often serialize other types of data into strings (via JSON, for example); so if it is not binary, it can probably be turned into a string. 

IndexedDB can natively accept most JavaScript objects (with a few exceptions, such as functions). 
The File API accepts both text and binary objects, so it is the most capable in this regard.


cookiesString
localStorageStrings
IndexedDBMost JS Objects
File APIText, Binary

Storage Limit


The APIs differ in the quantity of data they can store, so even if you are storing strings, your API choice is affected by how much string data you need to store.

The cookies can only store up to 4KB each (~4000 ASCII characters), and the specification recommends that browsers support a minimum of 20 per domain and a 300 total. The localStorage quota varies, with some browsers supporting 2MB per domain, some seemingly unlimited, and most averaging around 5MB.

The indexedDB and File API specifications don't yet give recommendations for how much browsers should give to websites, so Chrome is currently experimenting with a unified quota API for those APIs. With their quota system, there are two types of storage — temporary and permanant. Any data in temporary storage can be evicted by the browser whenever it feels the need. Data in permanent storage will only be removed when the website or user requests it. For temporary storage, a website can use up to 20% of the total available temporary storage space, but for any permanent storage, the website must explicitly ask the user for the permission to use that space, and then can request however much space is available.


With all of these APIs, you can never safely assume that you can store everything. It's the user's computer that you're storing data on, not your own server, and it's ultimately up to the users to decide what to do with their hard drive space.
                     
cookies4KB each, 20 per domain min
localStorage2.5-5MB average
IndexedDBTemporary: up to 20% of available space per app.
Permanent: Can request up to 100% of available space.
File APISame as IndexedDB

Browser Support

The HTML5 storage options have a wide range of browser support, as there's been a lot of disagreement in the standards world about what a client-side storage API should look like. 

The localStorage API was the simplest and least controversial of the APIs, and so it was the first to be implemented. It's now supported in all "modern browsers," including IE8. 
The IndexedDB and File APIs are growing in acceptance among browser vendors and  hope to see significantly more support for them over the coming year. At the time of writing, however, the IndexedDB is supported only in FireFox 4+ and Chrome 11+. 
The File API is only supported in Chrome.


What API to Use

In situation of having to develop only for one browser (like making a Chrome extension or an internal tool), you could consider using the File API or IndexedDB API. However, most Web developers are trying to target multiple browsers and given the browser support situation, the only practical cross-platform HTML5 data storage option is the localStorage API.


cookiesGood fallback.
localStoragePractical current option.
IndexedDBGood future option.
File APIChrome-only!

HTML5 contenteditable attribute with demo

  • The HTML5 contenteditable attribute specifies whether or not a user is allowed to edit the content.
  • Editable content means the content that can be edited after being loaded on the Web browser.
  • We can make content of an HTML element as editable by using the contentEditable attribute.
  • The contenteditable attribute is supported in all major browsers.
Syntax:

<element contentEditable= [ value ]>

In the preceding syntax, element refers to an HTML element and the contentEditable attribute can take any of the following values:
  • true - Indicates that the element is editable.
  • false - Indicates that the element is not editable.
  • inherit - Indicates that the element is also editable if parent is editable.

Example:


In the preceding example, we have created a simple To do List. We have set the editablecontent of the div to true so that you can edit the list items and also can create new list item.

            We can confirm whether an element is editable or not by using the isContentEditable attribute, which returns true if the element is editable, and false if it is not. The syntax to use the isContentEditable attribute is as below:


element.isContentEditable

In the preceding syntax, the element returns true if it is editable; otherwise, returns false.


Example:

HTML5 spellcheck attribute with demo

  • The HTML5 spellcheck attribute specifies whether or not the spelling or grammar checking feature is enabled for an element.
  • The spellcheck attribute is introduced in HTML5 to allow to check spelling mistakes of the editable text.
  • This feature uses the contentEditable attribute to find spelling mistakes in Web page.
  • The spellcheck attribute is supported in all major browsers like IE 10, Firefox, opera, chrome and safari. The spellcheck attribute is not supported in IE 9  and earlier versions.
Syntax:

<element spellcheck= [ value ]>

In the preceding syntax, element represents an HTML element and the spellcheck attribute can take any of the following values:


  • true - Checks an element for spelling and grammar if its content is editable.
  • false - Does not check an element for spelling and grammar.
  • inherit - Specifies that an element inherits the spell check behaviour from its parent element.


Example:


Arrays in JQuery

  • The Array object is used to store multiple values in a single variable. 
  • An Array can hold different types of data types in a single array slot, which implies that an array can have a string, a number, or an object in a single slot.
Creating an Array:

An Array object can be created in the following ways:
  • Using the array Constructor
  • Using the array literal notation
Using the array Constructor
An empty array is created in cases where you do not know the exact number of elements to be inserted in an array. You can create an empty array by using an array constructor, as shown below:

    var myArray = new Array();

You can also create an array of any given size as shown below:


    var myArray = new Array(size);
    var myArray = new Array(20);

In the preceding code snippet, an array with 20 items is created.

You can also create an array with given elments as shown below:


    var array1 = new Array("Henry", "Fabregas", "Wilshere", "Cazorla", "Ozil");
    var array2 = new Array("IT", "Weekend", "Appraisal", "Escalation", "Resignation");

In the preceding code arrays with given values are created.

Using the array Literal notation

An array can be created by using the array literal notations. Array literal notations are comma-separated list of items enclosed by square brackets.

The syntax to create an empty array by using the array literal notation is shown below:


    var myArray = [];

The following code snippet shows how to create an array with given elements:


    var array1 = ["Ozil", "Cazorla"];
    var array2 = [6, "Cazorla",true];

In the preceding code snippet, an array containing different values, such as number 6, string Cazorla and boolean value true is created.

Methods of Array Object


  • push:
The push method adds new element as the last element and returns the length of the new array.

Simple Example:


In the above example, we have create a simple array, and added two elements to it. We have also created button on click of which the array elements are shown using paragraph element.

Another Example:


In the above example, we have created an array added elements into it as per user choice and also displayed its size.


  • pop: 
The pop method removes the last element of an array and returns that element. It is opposite to the method push.

Simple Example:


In the preceding example, we have created an array with five elements. We then used pop method to remove last element from an array. The pop method also returned the element removed, we have captured it in a variable and showed on UI.

Another Example:


In the preceding example, we have created an array. On click of pop button we are removing last element from the array and displaying the removed and current array.


  • concat:
The concat method joins two or more arrays and returns te joined array. The concat method accepts the another array object to concat. In order to concat more than two arrays, pass multiple arrays to concat method comma separated.


In the preceding example, we have shown how to concat two or more arrays using concat method.


  • join:
The join method joins all elements of an array into a string. This method creates a string representation of an array by joining all its elements using a separator string. If no separator is supplied, i.e. join() without an argument, the array will be joined using comma.


In the preceding example, we have seen how to join array elements by passing different arguments.


  • reverse:
The reverse method reverses the order of list of elements in an array.


In the preceding example, we have created an array used reverse method and displayed the result.


  • shift:
The shift method removes the first element from an array and returns the removed element. The combination of push() and shift() creates the method of queue.


In the preceding example, we have used shift method to remove the first element from an array.


  • slice:
The slice method selects part of an array and returns that selected part as a new array. The slice method takes one parameter which is the index of element to start slicing.


  • sort:
The sort method sorts the elements of an array. This method takes one parameter, which is a comparing function. If this function is not given, the array is sorted ascending.


In the preceding example, we have used sort method to sort the array elements in both ascending and descending order. In case of descending, If the return value is less than zero, the index of a is before b, and if it is greater than zero it's vice-versa. If the return value is zero, the element's index is equal.


  • splice:
The splice method adds or removes the elements of an array. The splice takes three parameters:


  • Index – The starting index.
  • Length – The number of elements to remove.
  • Values – The values to be inserted at the index position.


  • toString:
The toString method converts an array into a string and returns the string.


  • unshift:
The unshift method adds new elements to an array and returns the new length. The unshift element adds elment to the first position.


Length property of Array object
The length property holds the number of elements in an array. This property is used to determine the amount of items in an array.


Looping through an array

Following are the ways by which we can loop through an array.


BeginForm Helper in MVC 3 Razor

  • We create form to post user's input to the server, ore render the same data from the server on the UI.
  • BeginForm HTML Helper is use to create form on the UI. The HTML helper renders the form tag as markup.
  • The BeginForm helper method has various overloads. 
  • In this article we will see how we can use this helper to render form element.
Example:

Controller:
        //Renders the View with form
        public ActionResult HtmlForm()
        {
            return View();
        }

        //Form is posted to this method.
        [HttpPost]
        public ActionResult HtmlForm(CustomerViewModel model)
        {
            return View();
        }
    

We have used two Action methods for this example. The first method renders the view. The second method is the one where form is posted. The second method has HTTPPost attribute denoting it is the form post and accepts an object of CustomerViewModel class.

ViewModel:

        using System;
        using System.Collections.Generic;
        using System.Linq;
        using System.Web;

        namespace HtmlHelpers.ViewModel
        {
            public class CustomerViewModel
            {
                public int CustomerID { get; set; }

                public string Name { get; set; }

                public string City { get; set; }

                public string Email { get; set; }
            }
        }
    

The above class our ViewModel. The properties defined in this view model are rendered inside the form tag.

View:

        @model HtmlHelpers.ViewModel.CustomerViewModel

        @{
            ViewBag.Title = "HtmlForm";
        }

        <h2>HtmlForm</h2>


        @using (Html.BeginForm("HtmlForm", "Home"))
        {
            @Html.EditorForModel("CustomerViewModel")
            <input type="submit" id="SubmitButton" value="Submit" />
        }
    

We have used BeginForm helper in the above view. The BeginForm helper outputs both the opening <form> and the closing </form>. The helper emits the opening tag during the call to BeginForm, and the call returns an object implementing IDisposable. When execution reaches the closing curly brace of the using satement in the view, the helper emits the closing tag with implicit call to Dispose. The using trick makes the code simpler and elegant.
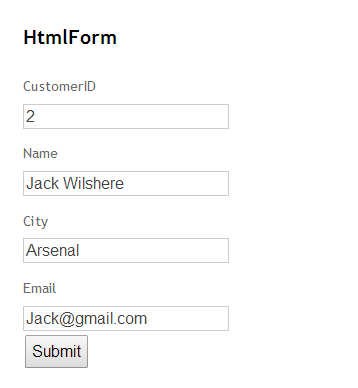
                                              The submit button posts the form to the HtmlForm action method of Home controller.

Screenshot:


By default BeginForm helper renders the form with POST form method. The BeginForm helper has overload which accepts a FormMethod type parameter using which we can specify POST or GET as type of form method.

Form with GET:

    @using (Html.BeginForm("HtmlForm", "Home", FormMethod.Get))
    {
        @Html.EditorForModel("CustomerViewModel")
        <input type="submit" id="SubmitButton" value="Submit" />
    }

The third parameter specifies whether the FormMethod is POST or GET. By default form is rendered with POST form method. The HtmlForm action method is called when the form is rendered with GET FormMethod.

We can also pass parameter to the Action method using GET. 


    @using (Html.BeginForm("HtmlForm", "Home", FormMethod.Get))
    {
        @Html.EditorForModel("CustomerViewModel")
        <input type="submit" id="SubmitButton" value="Submit" />
    }
    
Controller:
        [HttpGet]
        public ActionResult HtmlForm(int? CustomerID)
        {
            CustomerViewModel model = new CustomerViewModel();
            if (CustomerID > 0)
            {
                model.CustomerID = 1;
                model.Name = "Jack Wilshere";
                model.Email = "Jack@gmail.com";
                model.City = "Arsenal";
            }
            return View(model);
        }
    
ViewModel:
        using System;
        using System.Collections.Generic;
        using System.Linq;
        using System.Web;
        using System.ComponentModel.DataAnnotations;

        namespace HtmlHelpers.ViewModel
        {
            public class CustomerViewModel
            {
                public int CustomerID { get; set; }

                public string Name { get; set; }

                public string City { get; set; }

                public string Email { get; set; }
            }
        }
    
After the form is rendered on UI, we need to provide the CustomerID on the form and click on search button. The form is submitted to HTMLForm action method which accepts the CustomerID parameter. The value entered in the CustomerID field is present in the CustomerID parameter. You need to make sure that the ViewModel property name and the parameter name matches in order to receive the user input.

UI:

We will enter the CustomerID and will click on Submit button. The form is submitted to Action method with the entered CustomerID. We can use the parameter to fetch desired data from database. The data is displayed on UI as shown below.


There is another overload of this helper which accepts the htmlAttributes.

Overload with htmlAttributes:

    @using (Html.BeginForm("HtmlForm", "Home", FormMethod.Get, new { target = "_blank" }))
    {
        @Html.EditorForModel("CustomerViewModel")
        <input type="submit" id="SubmitButton" value="Submit" />
    }
    

In the above code, you are passing an anonymously typed object to the htmlAttribute parameter of BeginForm. You will also find an htmlAttributes parameter of type IDictionary<string, object> in a different overload. 
              In the above example, we have set target="_blank" using the htmlAttributes. We can set as many attribute values using the htmlAttributes parameter as necessary.

Inside BeginForm:


The BeginForm helper asks the routing engine how to reach the HtmlForm action of HomeController. Behind the scenes it uses the method name GetVirtualPath on the Routes property exposed by RouteTable.

Types of CSS Styles


In this article we will see how to insert CSS in an HTML Document.
  • We can use a CSS style sheet with an HTML document by learning how to link the CSS code with the HTML document. 
  • A CSS style sheet can be linked to an HTML document in a variety of ways, where each way has its own advantages and disadvantages.
  • The following are the three ways to aplly CSS style to your HTML document:
1. The internal style sheet
2. The external style sheet
3. The in-line style

DEMO

The Internal Style Sheet:
The internal style sheet is written within the HEAD element of the HTML document. This style is applied only to the document in which it is defined. The syntax of internal style sheet is written as follows:


    <style type="text/css">
        selector {property : value;}
    </style>

The preceding syntax contains the starting and ending tags of the STYLE element. The STYLE element contains a type attribute with value text/css. The opening and the closing tags of the STYLE element embeds the style declaration. The declaration consists of selector followed by curly braces. The curly braces hold a property followed by a colon, which is further followed by a value, and finally that value is followed by a semicolon.


    <head>
    <style type="text/css">
        p{font-family:Comic Sans MS;color:Blue;}
        #target{font-family:Comic Sans MS;color:Red;}
    </style>
    </head>

In the preceding code snippet, the STYLE element is placed inside HEAD element. The CSS statements are written within the STYLE element.

Advantages:


  • Affects only the page in which they are placed. You can use this style if the CSS is page specific.
  • Allows you to change the style of the same HTML file in which you are working.
DisAdvantages:
  • Affects only the page to which they are applied. If you want to use the same styles in other documents, you need to repeat them for every page.
  • Increases the page load time because the entire CSS file needs to be implemented first to apply CSS.
The External Style Sheet:
The syntax to create an external style sheet is same as that of creating an internal style sheet. In case if internal style sheet the style is placed in the HTML document; whereas, in case of external style sheet, the CSS file is written outside the HTML document and the reference of the CSS file is placed in the HTML document. In an external style sheet, the style sheet rules are saved into a text file with the .css extension. Once you have created your CSS file, you can link with web pages. The CSS file can be linked with HTML document in two ways explained below:


  • Linking - This way refers to the HTML LINL element, which is used to link a style sheet. This LINK element has three attributes - rel, type and href. The rel attribute specifies what you are linking (stylesheet as value in our case). The type specifies the MIME type for the browser, and the href attribute specifies the path of the .css file. 
        <link rel="Stylesheet" type="text/css" href="test.css" />
    

    In the preceding code snippet, the value of the rel attribute is set to stylesheet, value of the type attribute is set to text/css, and that of the href attribute is set to test.css.
  • Importing - This way helps you in accessing the style rules from other CSS style sheets. The @import keyword is used followed by the Uniform Resource Identifier(URI) of the stylesheet to which you want to import the style rules.
        <style type="text/css">
            @import url("targetStyle.css")
            p{color:Red;}
        </style>
    

    In the preceding code snippet, we have used the @import keyword followed by the URL of the stylesheet. In addition to the import rule, the @media rule of CSS helps you in applying the styles to the media device depending on the type of the device a page is displaying. Some of the media devices supported by CSS are computer screens, printers, televisions, handhelds, speech synthesizers, and projectors.
Advantages:
  • Allows you to control the look and feel of several documents in one go and do not need to define a specific style for every element.
  • Allows you to easily group your styles in a more efficient way.
DisAdvantages:
  • Increases the download time as the entire CSS file has to be downloaded to apply the style to the HTML document. When the styles are less in number, applying external style sheet can make the document complicated.
  • Displayes the Web page only after the entire style sheet is loaded.
The Inline style:
The inline style properties are written in a single line separated by semicolons. These properties are placed inside the style attribute of the HTML element, on which you want to apply the CSS.

        <div>
            <p style="color:Red;font-family:Comic Sans MS;">This is paragraph element.</p>
        </div>
    
In the preceding the paragrah element is styled.

Advantages:

  • Provides the highest precedenceover internal and external style sheets. Therefore, if you want some styles to be compulsorily applied, use inline style or else override CSS styles.
  • Provides an easy and quick approach to add a style sheet in a web page.
DisAdvantages:
  • Makes a document difficult to download and increases the download time. 
  • Does not allow to style pseudo-elements, which are used to add special effects to the selectors. For example: you provide different styles or colors to differentiate between active, visited or non-visited links.